var express = require('express');
var http = require('http');
var serveStatic = require('serve-static'); //특정 폴더의 파일들을 특정 패스로 접근할 수 있도록 열어주는 역할
var path = require('path');
var cookieParser = require('cookie-parser');
var expressSession = require('express-session');
var expressErrorHandler = require('express-error-handler');
var mongoose = require('mongoose');
//암호화 모듈
var crypto = require('crypto');
var database;
var userSchema;
var userModel;
//몽고디비에 연결 , 보통 웹서버 만든 직후 연결 , DB 먼저 연결 되도 상관 없음
//먼저 db를 가져온다
function connectDB() {
//localhost 로컬 호스트
//:27017 몽고디비 포트
//local db 생성시 만든 폴더 명
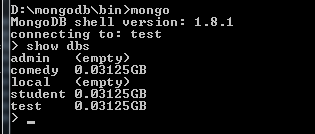
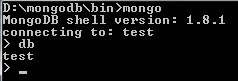
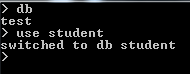
var databaseURL = 'mongodb://localhost:27017/test';
mongoose.Promise = global.Promise;
mongoose.connect(databaseURL);
database = mongoose.connection; //db와 연결 시도
database.on('open', //db 연결 될때의 이벤트
function () {
console.log('data base 연결됨 ' + databaseURL);
//몽구스는 스키마를 정의하고 해당 스키마에 해당 하는 데이터를 집어넣는 방식으로 테이블과 유사
userSchema = mongoose.Schema({
//id: String, 타입만 세팅하는 것이 아니고 여러가지 속성을 넣고 싶다면 객체로 추가한다
id: { type: String, required: true, unique: true, 'default':'' }, //required : 필수로 넣어야 하는 요소, unique 유일해야하는 값
hashed_passwords: { type: String, required: true, 'default': '' }, //passwords 는 유니크할 필요는 없음으로 뺌
salt: {type:String, required:true},
name: { type: String, index: 'hashed', 'default': '' }, //name 을 넣긴 하는데 hash 로 처리
age: { type: Number, 'default': -1 }, //초기 값을 -1 로
created_at: { type: Date, index: { unique: false }, 'default': Date.now() },
updated_at: { type: Date, index: { unique: false }, 'default': Date.now() }
});
console.log('userSchema 정의함');
//virtual 함수는 passwords 가 new userModel(...) 로 생성자에 의해 실행되면서 값이 넘어갈때 실행된다
//method 에 추가된 함수는 인스턴스에 함수가 추가된다
//그래서 this.makeSalt() 이런 함수 호출이 가능하다
userSchema.virtual('passwords').set( //여기서 virtual 은 C++ 에서의 virtual 과는 전혀 상관이 없다
function (passwords)
{
console.log(userModel === this); //false
console.log(userSchema === this); //false
dd1 = this;
//이때의 this 는 추가한 데이터 객체의 this 임
this.salt = this.makeSalt();
this.hashed_passwords = this.encryptPassword(passwords);
console.log('this.hashed_passwords 저장됨 : ' + this.hashed_passwords);
}
);
//encryptPassword 속성 추가 ,
//method 에 추가된 함수는 인스턴스에 함수가 추가된다
userSchema.method('encryptPassword',
//plainText : plainText : 가상속성 pw 값
//inSalt 에 따라서 암호화 방식을 다르게함
function (plainText, inSalt) {
if (inSalt) {
//'sha1'암호화 방식
//plainText : 가상속성 pw 값
//digest 암호화 처리
return crypto.createHmac('sha1', inSalt).update(plainText).digest('hex');
} else {
//'sha1'암호화 방식
//document 만들때 virtual 함수에서 salt을 저장한 값을 그대로 가져와서 암호화한다
return crypto.createHmac('sha1', this.salt).update(plainText).digest('hex');
}
});
userSchema.method('makeSalt',
function (plainText, inSalt) {
console.log(userModel === this); //false
console.log(userSchema === this); //false
return Math.round(new Date().valueOf() * Math.random()) + '' ;
});
userSchema.method('authenticate',
function (plainText, inSalt, hashed_passwords) {
if (inSalt) {
//insalt 키와 패스워드를 암호화 하여 데이터베이트 암호화된 pw 와 같은지 비교
return this.encryptPassword(plainText, inSalt) === hashed_passwords;
} else {
return this.encryptPassword(plainText) === hashed_passwords;
}
});
//모델 객체에 사용할 수 있는 함수를 추가(등록)한다
//스키마에 함수를 추가 했지만 모델에서 사용 할 수 있음
userSchema.static('findByID',
function (id, callback) {
//userModel == this;
console.log(userModel == this);
return this.find({ id: id }, callback);
}
);
/* //객체를 넣을 수도 있음
userSchema.static.findByID = function (id, callback)
{
//this 는모델객체를 의미함
return this.find({id:id}, callback);
}
);
*/
userSchema.static('findAll',
function (callback) {
return this.find({}, callback);
}
);
//컬렏션과 스키마를 연결시킴
userModel = mongoose.model('users3', userSchema);
console.log('userModel 정의함');
}
);
database.on('disconnected', //db 연결 끊길떄
function () {
console.log('data base 연결 끊어짐');
}
);
database.on('error', //에러 발생하는 경우
console.error.bind(console, 'mongoose 연결 에러')
);
}
var app = express(); //express 서버 객체
app.set('port', 3000);
app.use(serveStatic(path.join('public', __dirname, 'public')));
var bodyParser_post = require('body-parser'); //post 방식 파서
//post 방식 일경우 begin
//post 의 방식은 url 에 추가하는 방식이 아니고 body 라는 곳에 추가하여 전송하는 방식
app.use(bodyParser_post.urlencoded({ extended: false })); // post 방식 세팅
app.use(bodyParser_post.json()); // json 사용 하는 경우의 세팅
//post 방식 일경우 end
app.use(serveStatic(path.join(__dirname, 'public')));
//쿠키와 세션을 미들웨어로 등록한다
app.use(cookieParser());
//세션 환경 세팅
//세션은 서버쪽에 저장하는 것을 말하는데, 파일로 저장 할 수도 있고 레디스라고 하는 메모리DB등 다양한 저장소에 저장 할 수가 있는데
app.use(expressSession({
secret: 'my key', //이때의 옵션은 세션에 세이브 정보를 저장할때 할때 파일을 만들꺼냐 , 아니면 미리 만들어 놓을꺼냐 등에 대한 옵션들임
resave: true,
saveUninitialized: true
}));
//라우트를 미들웨어에 등록하기 전에 라우터에 설정할 경로와 함수를 등록한다
//
//라우터를 사용 (특정 경로로 들어오는 요청에 대하여 함수를 수행 시킬 수가 있는 기능을 express 가 제공해 주는것)
var router = express.Router();
router.route('/process/login').post(
function (req, res) {
console.log('process/login 호출됨');
var paramID = req.body.id || req.query.id;
var paramPW = req.body.passwords || req.query.passwords;
console.log('paramID : ' + paramID + ', paramPW : ' + paramPW);
if (database) {
authUser(database, paramID, paramPW,
function (err, docs) {
if (database) {
if (err) {
console.log('Error!!!');
res.writeHead(200, { "Content-Type": "text/html;charset=utf-8" });
res.write('<h1>에러발생</h1>');
res.end();
return;
}
if (docs) {
console.dir(docs);
res.writeHead(200, { "Content-Type": "text/html;charset=utf-8" });
res.write('<h1>Login Success</h1>');
res.write('<h1> user </h1>' + docs[0].id + ' : ' + docs[0].name);
res.write('<br><a href="/login.html"> re login </a>');
res.end();
}
else {
console.log('empty Error!!!');
res.writeHead(200, { "Content-Type": "text/html;charset=utf-8" });
res.write('<h1>user data not exist</h1>');
res.write('<a href="/login.html"> re login</a>');
res.end();
}
}
else {
console.log('DB 연결 안됨');
res.writeHead(200, { "Content-Type": "text/html;charset=utf-8" });
res.write('<h1>databasae 연결 안됨</h1>');
res.end();
}
}
);
}
}
);
router.route('/process/addUser').post(
function (req, res) {
console.log('process/addUser 호출됨');
var paramID = req.body.id || req.query.id;
var paramPW = req.body.passwords || req.query.passwords;
var paramName = req.body.name || req.query.name;
console.log('paramID : ' + paramID + ', paramPW : ' + paramPW);
if (database) {
addUser(database, paramID, paramPW, paramName,
function (err, result) {
if (err) {
console.log('Error!!!');
res.writeHead(200, { "Content-Type": "text/html;charset=utf-8" });
res.write('<h1>에러발생 - 이미 존재하는 아이디일 수 있습니다</h1>');
res.write('<br><a href="/login.html"> re login </a>');
res.end();
return;
}
if (result) {
console.dir(result);
res.writeHead(200, { "Content-Type": "text/html;charset=utf-8" });
res.write('<h1>Add Success</h1>');
res.write('<h1> name </h1>' + paramName);
res.write('<br><a href="/login.html"> re login </a>');
res.end();
}
else {
console.log('추가 안됨 Error!!!');
res.writeHead(200, { "Content-Type": "text/html;charset=utf-8" });
res.write('<h1>can not add user</h1>');
res.write('<a href="/login.html"> re login</a>');
res.end();
}
}
);
}
else {
console.log('DB 연결 안됨');
res.writeHead(200, { "Content-Type": "text/html;charset=utf-8" });
res.write('<h1>databasae 연결 안됨</h1>');
res.end();
}
}
);
router.route('/process/listUser').post(
function (req, res) {
console.log('process/listuser 호출됨');
if (database) {
userModel.findAll(
function (err, results) {
if (err) {
console.log('Error!!!');
res.writeHead(200, { "Content-Type": "text/html;charset=utf-8" });
res.write('<h1>전체 유저 검색 - 에러발생</h1>');
res.end();
return;
}
if (results) {
console.dir(results);
res.writeHead(200, { "Content-Type": "text/html;charset=utf-8" });
res.write('<h1>User List</h1>');
res.write('<div><ul>');
for (var i = 0; i < results.length; ++i) {
var curID = results[i]._doc.id;
var curName = results[i]._doc.name;
res.write("<li>#" + i + " ->" + curID + " , " + curName + " </li>");
}
res.write('</ul></div>');
res.write('<br><a href="/login.html"> re login </a>');
res.end();
}
else {
console.log(' 조회된 사용자 없음');
res.writeHead(200, { "Content-Type": "text/html;charset=utf-8" });
res.write('<h1>조회된 사용자 없음</h1>');
res.write('<a href="/login.html"> re login</a>');
res.end();
}
}
);
}
else {
console.log('DB 연결 안됨');
res.writeHead(200, { "Content-Type": "text/html;charset=utf-8" });
res.write('<h1>databasae 연결 안됨</h1>');
res.end();
}
}
);
//라우터 미들웨어 등록하는 구간에서는 라우터를 모두 등록한 이후에 다른 것을 세팅한다
//그렇지 않으면 순서상 라우터 이외에 다른것이 먼저 실행될 수 있다
app.use('/', router); //라우트 미들웨어를 등록한다
var dd1;
var authUser = function (db, id, password, callback) {
console.log('input id :' + id.toString() + ' : pw : ' + password);
userModel.findByID(id,
function (err, result) {
if (id === undefined || password === undefined) {
console.log('id or pw 필수');
return;
}
if (err) {
callback(err, null);
return;
}
console.log('아이디 %s 로 검색 ');
if (result.length > 0) {
var user = new userModel({ id: id });
console.log(user === dd1);
//password : 현재 사용자가 로그인 하기 위해 입력한 암호
//result[0]._doc.salt 암호화를 위해 만들었던 임의의 값
//result[0]._doc.hashed_passwords : 암호화 되어 DB에 저장되어 있는 암호화된 PW
var authenticated = user.authenticate(password, result[0]._doc.salt, result[0]._doc.hashed_passwords);
if (authenticated) {
console.log(' 비번 일치 ');
callback(null, result);
}
else {
console.log(' 비번 일치하지 않음 ');
callback(null, null);
}
}
else {
console.log('아이디 일치하는 사용자 없음');
callback(null, null);
}
}
);
};
var addUser = function (db, id, passwords, name, callback) {
console.log('add User 호출됨' + id + ' , ' + passwords);
var user = new userModel({ "id": id, "passwords": passwords, "name": name });
//user 정보를 DB 에 저장
user.save(
function (err) {
if (err) {
callback(err, null);
return;
}
//데이터가 추가됐다면 insertedCount 카운트가 0 보다 큰값이 된다
console.log('사용자 추가 됨');
callback(null, user);
}
);
};
var errorHandler = expressErrorHandler(
{ static: { '404': './public/404.html' } } //404 에러 코드가 발생하면 해당 페이지를 보여주는 예외 미들웨어
);
app.use(expressErrorHandler.httpError(404));
app.use(expressErrorHandler);
//웹서버를 app 기반으로 생성
var appServer = http.createServer(app);
appServer.listen(app.get('port'),
function () {
console.log('express 웹서버 실행' + app.get('port'));
connectDB(); //DB 연결 , DB 연결 먼저해도 상관 없음
}
);


 DataBAseSample0.zip