The error message you're encountering indicates that there's an issue with a Git Large File Storage (LFS) object that is preventing your push to GitLab. Specifically, a file (AI/pyvideotrans-main/ffmpeg/you-get.exe) is marked as missing in the LFS, which is causing the push to fail. Here's how you can address this issue:
Verify LFS Objects: First, ensure that all the necessary files are tracked and uploaded correctly in LFS. You can list LFS objects that are supposed to be uploaded with:이you-get.exe file or any other files are indeed missing or incorrectly tracked.
bashCopy code
git lfs ls-files
Check for Missing Files: If the you-get.exe file is missing from your local repository, you'll need to obtain it again. This could mean downloading it from a source or finding the correct version of the file that should be there.
Re-upload LFS Objects: After you've added or corrected the file in your local repository, you'll need to re-upload the LFS objects. You can do this with:
bashCopy code
git lfs push --all origin
Consider LFS Locking: The message about LFS locking is a suggestion for managing LFS files, especially in a team environment. Enabling LFS file locking can prevent accidental overwrites when multiple people are working with large files. You can enable it with:
Retry Pushing: Once you've addressed the missing file and re-uploaded the LFS objects, try pushing to the repository again:
bashCopy code
git push origin
Consider allowincompletepush Option: As a last resort, if you're certain that the missing LFS object is not critical and you need to push the other changes, you can disable the check that's causing the push to fail. However, this should be used with caution as it can lead to incomplete data in your repository:
Remember, it's important to resolve these issues correctly to ensure that your repository remains consistent and all necessary files are available for you and your team.
In Python, the error message "Defaulting to user installation because normal site-packages is not writeable" usually appears when you try to install packages without having the necessary permissions to write to the system-wide site-packages directory.
Occurrence
This commonly occurs in virtual environments or when you lack administrative access.
Error-resolving approaches
To resolve this error, you can use the following approaches:
Using a virtual environment
First, create a virtual environment using tools likevenvorvirtualenvusing this command in your terminal:
python -m venv myenv
Now, activate the virtual environment using these commands:
source myenv/bin/activate # for Linux/Mac
myenv\Scripts\activate.bat # for Windows
Finally, install packages within the virtual environment using this command in your terminal:
pip install package-name
This way, you will have write access to the virtual environment's site-packages directory without requiring system-wide permissions.
Specifying a user installation
You can install the package in the user’s local site-packages directory using this command:
pip install package-name--user
Use the--userflag when installing packages to specify a user installation instead of a system-wide installation.
Using a package manager
If you're using Linux, you can use system-wide package management likeaptoryumto install Python packages. Typically, administrative rights are needed for this.
sudo apt install python-package-name# for apt package manager
sudo yum install python-package-name# for yum package manager
Hence, these approaches provide you with the necessary write permissions to install packages in a controlled and isolated manner.
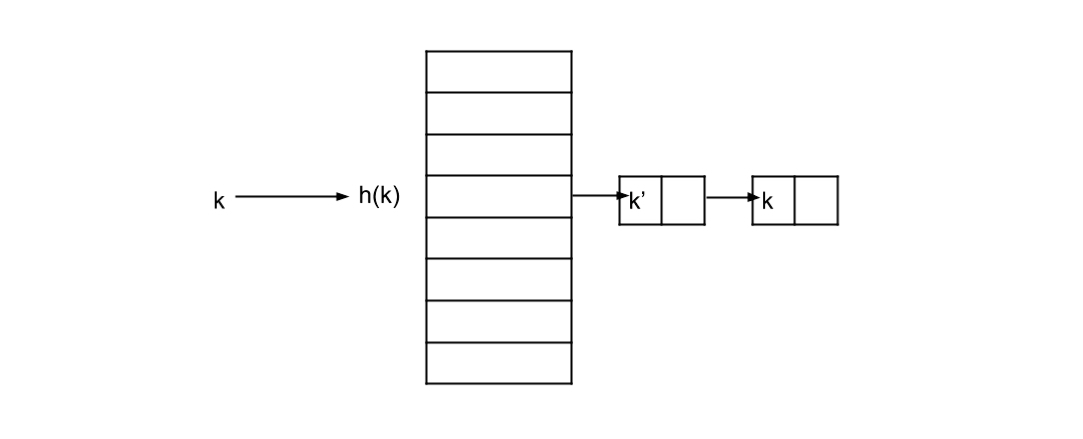
chaining 은 해쉬 테이블이 아닌 다른 자료 구조에 아이템을 저장해서 충돌을 해결하는 방법입니다. 해쉬 테이블의 각 인덱스에는 아이템이 아닌 또 다른 자료 구조를 가르키는 포인터가 저장됩니다. 이 자료 구조는 insert, search, 그리고 delete(k) 를 상수 비용으로 지원하는 Set Interface 이고chain이라고 합니다. linked list 나 array 를 생각하면 됩니다.
충돌이 발생해도 모든 해쉬 테이블의 chain 의 크기가 상수 이면 insert, serach, 그리고 delete(k) 를 O(1) 으로 수행할 수 있게 되고 이것이 hashing 을 통해 달성하고자 하는 목표인데요. 이를 위해서는 해쉬 함수가 중요합니다. 만약에 아주 안좋은 해쉬 함수를 선택해서 모든 키의 해쉬 값이 동일한 인덱스를 가진다면, 해당 인덱스 chain 의 크기는 O(n) 이 되고 insert, serach, 그리고 delete(k) 의 비용도 O(n) 이 되버립니다. 최악이죠.
이상적으로 어떠한 키 유니버스가 주어져도 충돌의 개수를 줄여서 테이블의 가장 큰 chain 의 크기가 상수인 해쉬 함수를 선택해야 합니다.
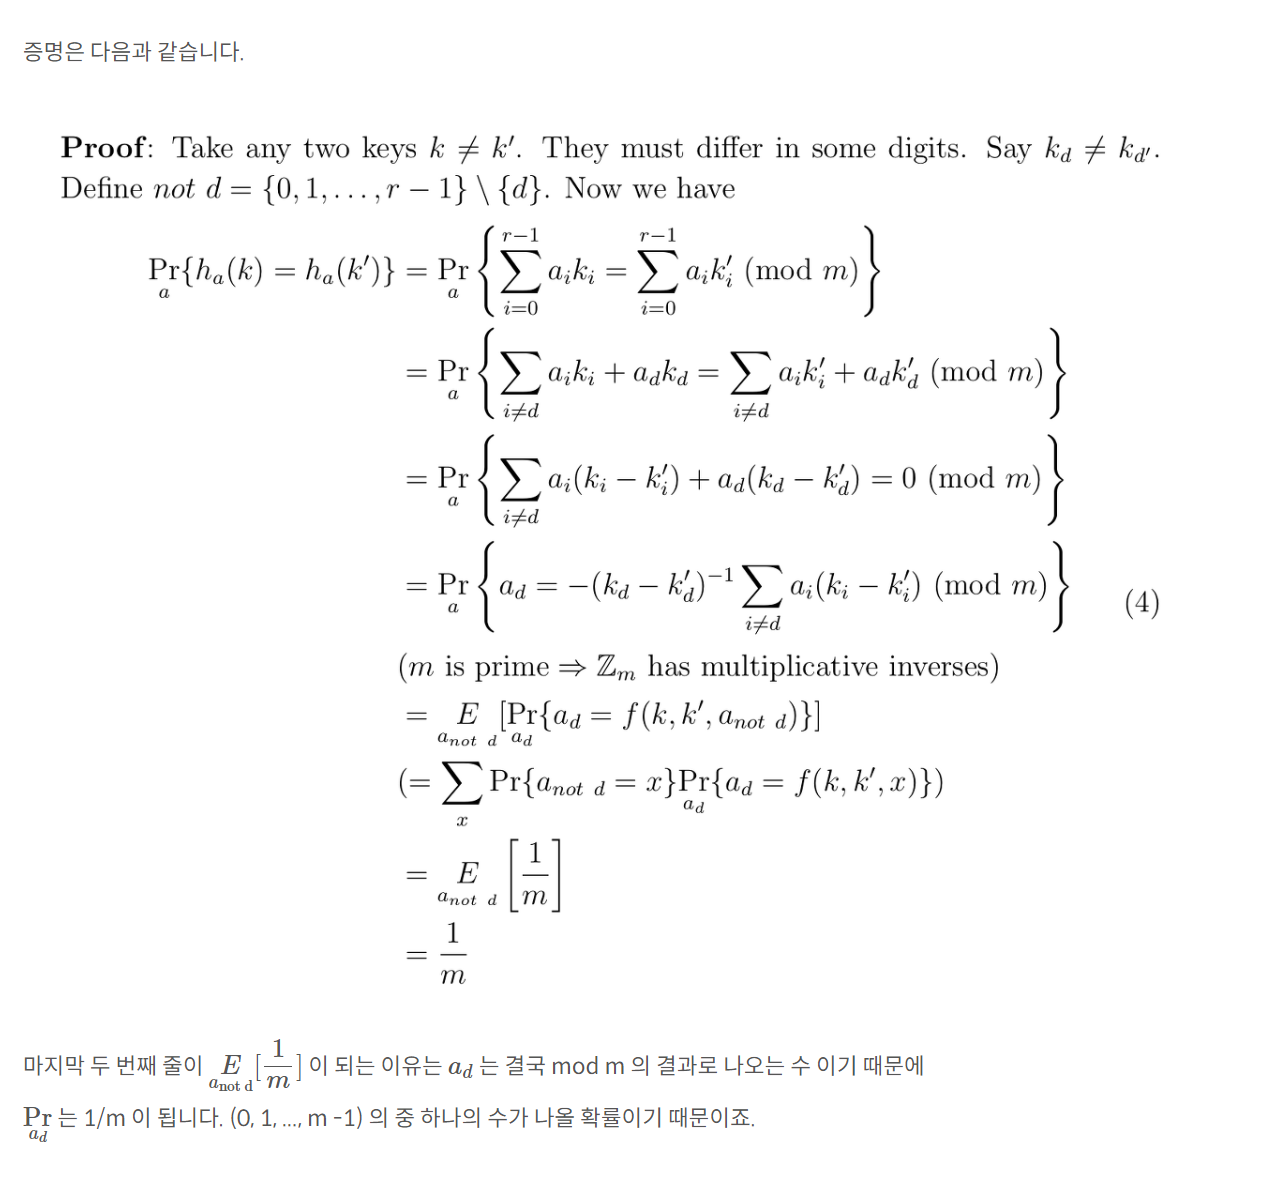
Universal Hashing
좋은 해쉬 함수의 기준을 다시 한번 정리하겠습니다.
어떠한 키 유니버스가 주어져도 충돌의 개수를 줄여서 가장 큰 chain 의 크기를 상수로 만드는 해쉬 함수
Multithreading your game has the potential to massively increase performance. You are getting an entire new thread to work with, so you can offload heavy tasks to your worker thread while your game thread keeps running at a high framerate.
Getting started with multithreading is daunting, at least it was for me, so I'm writing this to help out any fellow devs who might be interested in using this for your own project.
First off: is multithreading the right solution for you?The use case is quite limited, since there are a lot of things you can't do on the other thread. You can't read or write data that lives on your game thread, this includes modifying any UObjects. Doing so will result in undefined behavior - usually access violation errors.
So, what can you use it for? Think of it like an isolated part of your code, you can give it inputs, and then it will go off on it's own and calculate something only using the inputs you gave it. You can only (easily) multithread parts of your code that can be decoupled from the rest of the program.
For example, the way I used it was to calculate a custom lightmap using a recursive flood fill algorithm, the result is a dynamic 2D lightmap like the one in Terraria. First, the game thread prepares the data for the worker thread; it gets the details of every light on screen. Then, it gives the data to the worker thread, which performs the expensive calculations. Finally, the worker thread gives back the finished lightmap, and the cycle continues.
If you think your expensive task can be performed like this, you're in luck, because this guide will show you exactly how to implement it - without worrying about locking variables and mutexes.
Flip flop threading paradigm
I have no idea if that's a real paradigm, but that's what I'm going to call this system I created. This paradigm can be summarized by one video:
The game thread is the person flicking the switch, and the worker thread is the thing that switches it off. The switch itself is a boolean.
Basically, when the switch is off, the worker thread does nothing but check if the switch is on. This is when the game thread reads and writes to the worker thread. Once the game thread has finished, it flips the switch to on. When the worker thread sees that it's on, it will perform all of the calculations using the fresh data is received, and flips the switch off once it has finished.
Let's see how that looks in code.
First, let's lay out the foundations to get a FRunnable thread up and running. It won't do anything yet, other than log messages so we can see it working.
Header File
// Copyright notice

#pragma once

#include "CoreMinimal.h"
#include "HAL/Runnable.h"

/**
 *
 */
class GAMENAME_API FMyWorker : public FRunnable
{
public:

	// Constructor, create the thread by calling this
	FMyWorker();

	// Destructor
	virtual ~FMyWorker() override;


	// Overriden from FRunnable
	// Do not call these functions youself, that will happen automatically
	bool Init() override; // Do your setup here, allocate memory, ect.
	uint32 Run() override; // Main data processing happens here
	void Stop() override; // Clean up any memory you allocated here


private:

	// Thread handle. Control the thread using this, with operators like Kill and Suspend
	FRunnableThread* Thread;

	// Used to know when the thread should exit, changed in Stop(), read in Run()
	bool bRunThread;
};
C++ File
// Copyright notice

#include "MyWorker.h" // Change this to reference the header file above


#pragma region Main Thread Code
// This code will be run on the thread that invoked this thread (i.e. game thread)


FMyWorker::FMyWorker(/* You can pass in inputs here */)
{
	// Constructs the actual thread object. It will begin execution immediately
	// If you've passed in any inputs, set them up before calling this.
	Thread = FRunnableThread::Create(this, TEXT("Give your thread a good name"));
}


FMyWorker::~FMyWorker()
{
	if (Thread)
	{
		// Kill() is a blocking call, it waits for the thread to finish.
		// Hopefully that doesn't take too long
		Thread->Kill();
		delete Thread;
	}
}


#pragma endregion
// The code below will run on the new thread.


bool FMyWorker::Init()
{
	UE_LOG(LogTemp, Warning, TEXT("My custom thread has been initialized"))

	// Return false if you want to abort the thread
	return true;
}


uint32 FMyWorker::Run()
{
	// Peform your processor intensive task here. In this example, a neverending
	// task is created, which will only end when Stop is called.
	while (bRunThread)
	{
		UE_LOG(LogTemp, Warning, TEXT("My custom thread is running!"))
		FPlatformProcess::Sleep(1.0f);
	}

	return 0;
}


// This function is NOT run on the new thread!
void FMyWorker::Stop()
{
	// Clean up memory usage here, and make sure the Run() function stops soon
	// The main thread will be stopped until this finishes!

	// For this example, we just need to terminate the while loop
	// It will finish in <= 1 sec, due to the Sleep()
	bRunThread = false;
}
Creating and controlling the thread
This part is easy, just create an instance of the class above using regular C++:
FMyWorker* Worker =newFMyWorker();
The example is set up to run straight away, so if you want to pass it some data, you can either use the constructor, or move the Create() command to another function you can invoke when ready.
Remember to hold onto the pointer so you can delete it when no longer needed.
When finished, use the normal delete command:
delete Worker;
When you've done this, you should have a new thread that announces when it has been created, and will print a message to the log every second. The code should be stable and crash free.
Implementing the Flip Flop
Now that we have a basic thread, we can give it more functionality.
We need to create the boolean that acts as the switch, and the loop that reads this bool.
It's fairly straightforward, here is the code you need to add:
Header File
class GAMENAME_API FMyWorker : public FRunnable
{
public:

	[...]

	// ----------


	// The boolean that acts as the main switch
	// When this is false, inputs and outputs can be safely read from game thread
	bool bInputReady = false;


	// Declare the variables that are the inputs and outputs here.
	// You can have as many as you want. Remember not to use pointers, this must be
	// plain old data
	// For example:
	int ExampleIntInput = 0;
	float ExampleFloatOutput = 0.0f;


private:

	[...]
};
C++ File
uint32 FMyWorker::Run()
{
	// Peform your processor intensive task here. In this example, a neverending
	// task is created, which will only end when Stop is called.
	while (bRunThread)
	{
		if (bInputReady)
		{
			// Do your intensive tasks here. You can safely modify all input variables.
			// For the example, I'm just going to convert the input int to a float
			ExampleFloatOutput = ExampleIntInput;
			FPlatformProcess::Sleep(1.0f); // Simulate a heavy workload

			// Do this once you've finished using the input/output variables
			// From this point onwards, do not touch them!
			bInputReady = false;

			// I hear that it's good to let the thread sleep a bit, so the OS can utilise it better or something.
			FPlatformProcess::Sleep(0.01f);
		}

	}

	return 0;
}
That's all you need on the thread side of things. To access it from the game thread, do something like this:
// You need a function like Tick. You can also use timers
void AMyClass::Tick(float DeltaTime)
{
	if (Worker)
	{
		if (!Worker->bInputReady)
		{
			// Read and write the variables here
			Worker->ExampleIntInput = 3141592;
			UE_LOG(LogTemp, Warning, TEXT("Game thread: value gotten from worker thread: %f"), Worker->ExampleFloatOutput)


			// Flick the switch to let the worker thread run
			// Do not read/write variables from thread from here on!
			Worker->bInputReady = true;
		}
	}
}
Note: the variable Worker needs to be initialized before, like in BeginPlay(). Scroll up a bit to see how to initialize it.
현업 3D게임엔진 프로그래머가 전수해드리는 고농축 고퀄리티의 과외를 만나 보실 수 있습니다
※ 제대로 된 곳이 아닌 다른곳에서 어설프게 배웠거나 이해가 완벽하게 가지 않은 상태에서 계속 진행이 되어 시간과 비용만 낭비만 한채 또는 중도에 포기한 채 이곳을 찾아93%이상 분들이 원하는 결과를 얻고 가셨습니다 요행 길이라는 것은 없으며 제대로 된 곳에서 제대로된 진로를 고민해보시기 바랍니다.
[ 이력 ]
넥슨, 크래프톤, NHN, 넷마블 다수 동종/타종 근무경험 및 다년간 현업 개발자
3D,2D게임 엔진,컨텐츠 프로그래머/ 언리얼4,5/네트워크 동기화 프로그래머/애니메이션 메인, 물리엔진개발/ 다수와 다양한 장르의 모바일, PC 게임개발/서버/Shader 등등의 개발 경험/ UE,Unity
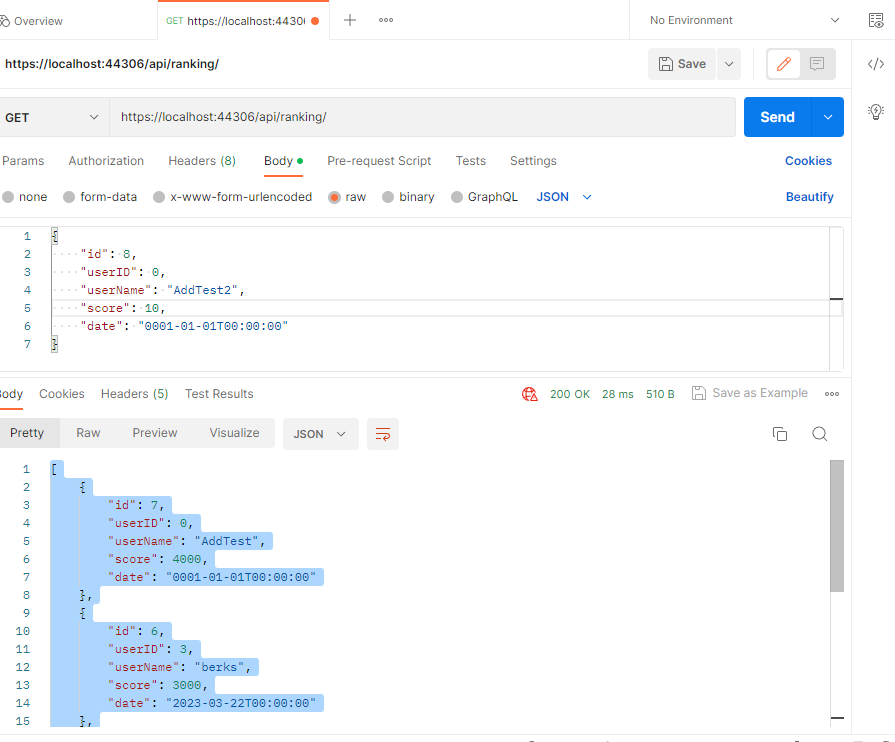
REST ( Representational State Trasnfer) 공식표준 스펙은 아닌데
원래 있던 HTTP 통신에서 재사용 하여 데이터 송수신 규칙을 만든것 => CRUD
CRUD 를 Blazor API 서버를 활용하여 작업 한것
using Microsoft.AspNetCore.Mvc;
using Microsoft.AspNetCore.Mvc;
using Microsoft.EntityFrameworkCore;
using SharedData.Models;
using System.Collections.Generic;
using System.Linq;
using WebAPI.Data;

namespace WebAPI.Controllers
{
    //www.google.com 이건 전체 주소
    //www.google.com/api/ranking   이건 세부 라우팅 주소로 전체 주소에서 구분지어 들어갈 때 사용됨
    //그 다음 어떤걸 하는지 지정 할 수 있다 GET, POST, PUT...)
    //Create : POST 방식 api/ranking => body 에 실제 정보를 담는다 , 아이템 생성 요청

    //Read 시에는 보통 Get 을 사용한다
    //GET : api/ranking => 전체 아이템을 가져온다 , api/ranking/1 id가 1인 아이템을 가져온다
    //get /api/ranking  모든 id를 주세요
    //get /api/ranking/1   id 중에서 1전을 주세요 라는 요청
    //get 은 body 에 정보를 넣지 않고 이 요청 하나로 처리 된다

    //update : put 으로 사용됨
    //PUT : api/ranking  (put은 보안 무제로 일반적인 웹에서 사용되지 않는다)
    //put 은 body 에 정보를 넣어서 요청을 보낸다

    //delete /api/ranking/1   이렇게 삭제 할 수 있는데 보안 문제로 웹에서 쓰지 않는다
    //id=1 번인 아이템 삭제 요청

    //api controller 는 c# 객체를 반환하는 것이 가능하다
    //null 반환하면 클라에서 204 Response (No Content) 를 받는다
    //String을 반호나하면 => text/plain 타입으로 반환한다
    //나머지는 json 형태로 반환한다

    //localhost:portnumber/api/ranking 이 요청이라는 얘기인데 RankingController 이것이 [controller] 부분에서 ranking 으로 변환됨
    [Route("api/[controller]")]
    [ApiController]
    public class RankingController : ControllerBase
    {
        ApplicationDbContext _context;
        public RankingController(ApplicationDbContext context)
        {
                _context = context;

        }

        //create, body 에 보낼때는 [frombody 를 넣어주면 된다]
        [HttpPost]
        public GameResult AddGameResult([FromBody] GameResult gameResult)
        {
            _context.GameResultList.Add(gameResult);
            _context.SaveChanges();
            return gameResult;
        }


        //update
        [HttpPut]
        public bool UpdateGameResult([FromBody] GameResult gameResult)
        {
            var findResult = _context.GameResultList.Where(item => item.Id == gameResult.Id).FirstOrDefault();
            if(findResult == null)
            {
                return false;
            }

            findResult.UserName = gameResult.UserName;
            findResult.Score = gameResult.Score;
            _context.SaveChanges();

            return true;
        }

        //read
        //ranking
        [HttpGet]
        public List<GameResult> GetGameResults()
        {
            List<GameResult> results = _context.GameResultList.OrderByDescending(item=> item.Score).ToList();
            return results;
        }

        //ranking/1
        [HttpGet("{id}")]
        public GameResult GetGameResult(int id)
        {
            GameResult result = _context.GameResultList.Where(item => item.Id == id).FirstOrDefault();
            return result;
        }


        //delete
        [HttpDelete("{id}")]
        public bool DeleteGameResult(int id)
        {
            var findResult = _context.GameResultList.Where(item => item.Id == id).FirstOrDefault();
            if (findResult == null)
            {
                return false;
            }
            _context.GameResultList.Remove(findResult);
            _context.SaveChanges();

            return true;
        }
    }
}
Console.WriteLine(default(int));  // output: 0
Console.WriteLine(default(object) is null);  // output: True

void DisplayDefaultOf<T>()
{
    var val = default(T);
    Console.WriteLine($"Default value of {typeof(T)} is {(val == null ? "null" : val.ToString())}.");
}

DisplayDefaultOf<int?>();
DisplayDefaultOf<System.Numerics.Complex>();
DisplayDefaultOf<System.Collections.Generic.List<int>>();
// Output:
// Default value of System.Nullable`1[System.Int32] is null.
// Default value of System.Numerics.Complex is (0, 0).
// Default value of System.Collections.Generic.List`1[System.Int32] is null.
using Microsoft.AspNetCore.Identity.EntityFrameworkCore;
using Microsoft.EntityFrameworkCore;
using Microsoft.EntityFrameworkCore.Migrations;
using RankingApp.Data.Models;
using System;
using System.Collections.Generic;
using System.Text;

namespace RankingApp.Data
{
    public class ApplicationDbContext : IdentityDbContext
    {
        //DbSet 으로 추가해줘야지 GameReesult.cs 에서 GameResultList 내용을 DB에 저장할 수 있다. ORM
        //즉 서버를띄울때 자동으로 DB를 갱신하여 띄워주게 된다
        //PM> add-migration RankingService  명령어르 NeGet 콘솔에서 실행하여 DB를 갱신해준다
        //PM> update-database 명령어르 NeGet 콘솔에서 실행하여 DB를 갱신해준다
        //주의!! GameResultList 이 테이블 명과 동일해야 한다 dbo.GameResultList 에서 dbo 빼고   GameResultList 만
        public DbSet<GameResult> GameResultList { get; set; }

        public ApplicationDbContext(DbContextOptions<ApplicationDbContext> options)
            : base(options)
        {
        }
    }
}
그런다음 패키지 관리자 콘솔에서 다음 처럼 입력한다음 다음 처럼 적용한다
PM> Add-Migration GameResultList
PM> Update-Database
이 처럼 마이그레이션이 변경된다
테이블명도 자동으로 바뀌게 된다
서비스 쪽에 갱신과 삭제에 대한 로직을 추가 하고 테이블에도 값이 삭제/갱신이 적용 될수 있게 처리 한다
       public Task<bool> UpdateGameResult(GameResult gameResult)
        {
            var result = _context.GameResultList.Where(x => x.Id == gameResult.Id).FirstOrDefault();
            if(result==null)
            {
                return Task.FromResult(false);
            }
            result.UserName = gameResult.UserName;
            result.Score = gameResult.Score;
            _context.SaveChanges();

            return  Task.FromResult(true);
        }

        public Task<bool> DeleteGameResult(GameResult gameResult)
        {
            var result = _context.GameResultList.Where(x => x.Id == gameResult.Id).FirstOrDefault();
            if (result == null)
            {
                return Task.FromResult(false);
            }
            _context.GameResultList.Remove(gameResult);
            _context.SaveChanges();
            return Task.FromResult(true);
        }
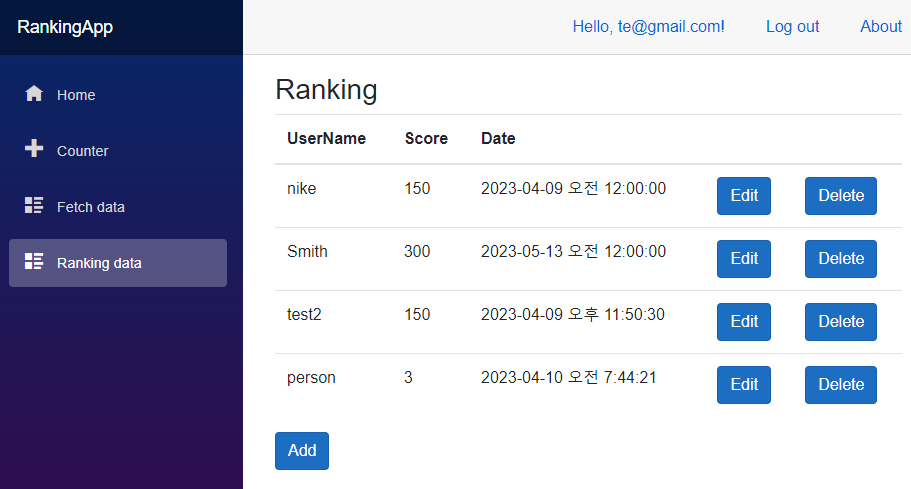
Ranking.razor
갱신과 삭제 버튼이 보여 내용을 수정 할수 있도록 하고
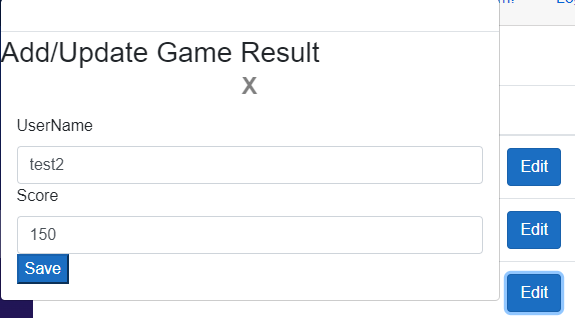
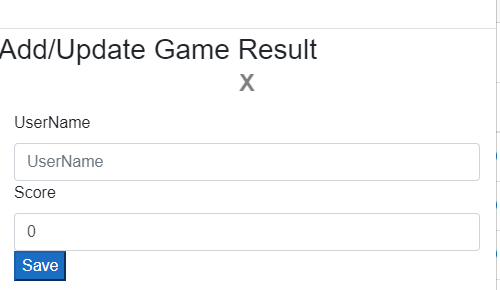
추가팝업과 갱신 팝업은 동일한 형태로 사용한다
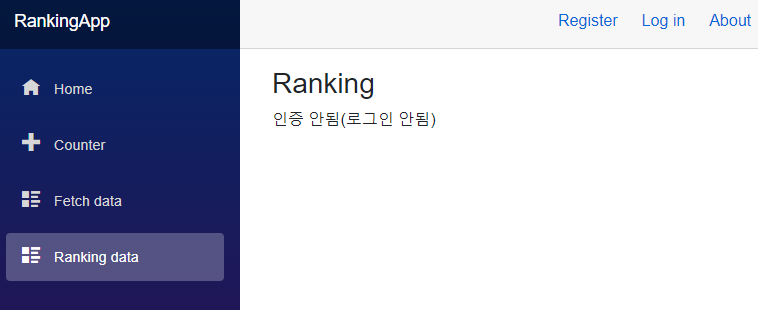
그리고 로그인이 되어 있지 않다면 유저 정보는 보이지 않도록 Autorized, NotAutorized 처리를 해 놓았다
@page "/ranking"
@using RankingApp.Data.Models;
@using RankingApp.Data.Services;

@inject RankingService RankingService

<h3>Ranking</h3>

<AuthorizeView>
    <Authorized>

        @if (_gameResultList == null)
        {
            <p>Loading...</p>
        }else{
            <table class="table">
                <thead>
                    <tr>
                        <th>UserName</th>
                        <th>Score</th>
                        <th>Date</th>
                        <th></th>
                        <th></th>
                    </tr>
                </thead>
                <tbody>
                    @foreach (var gameResult in _gameResultList)
                    {
                        <tr>
                            <td>@gameResult.UserName</td>
                            <td>@gameResult.Score</td>
                            <td>@gameResult.Date</td>
                            <td>
                                <button class="btn btn-primary" @onclick="() => EditGameResult(gameResult)">
                                    Edit
                                </button>
                            </td>
                            <td>
                                <button class="btn btn-primary" @onclick="() => DeleteGameResult(gameResult)">
                                    Delete
                                </button>
                            </td>
                        </tr>
                    }
                </tbody>
            </table>
            <p>
                <!-- make button to add gameresult -->
                <button class="btn btn-primary" @onclick="AddGameResult">
                    Add
                    </button>
            </p>


            @if(_showPopup)
            {
                //dialog to show gameresult
                <div class="modal" style="display:block" role="dialog">
                    <div class="modal-dialog">
                        <div class="modal-content">
                            <div class="modal-header"></div>
                            <h3 class="modal-title">Add/Update Game Result</h3>

                            <button type="button" class="close" @onclick="ClosePopup">
                                <span aria-hidden="true">X</span>
                            </button>
                            <div class="modal-body">
                                <label for="UserName"> UserName</label>
                                <input class="form-control" type="text" placeholder="UserName" @bind-value="_gameResult.UserName" />
                                <label for="Score"> Score</label>
                                <input class="form-control" type="text" placeholder="Score" @bind-value="_gameResult.Score" />

                                <button class="btn-primary" @onclick="SaveGameResult">Save</button>
                            </div>
                        </div>
                    </div>
                </div>

            }
        }

    </Authorized>
    <NotAuthorized>
        인증 안됨(로그인 안됨)
    </NotAuthorized>

</AuthorizeView>

@code {
    List<GameResult> _gameResultList;

    GameResult _gameResult;

    bool _showPopup = false;

    protected override async Task OnInitializedAsync()
    {
        //db 에서 데이터 긁어와서 _gameResults 에 넣어줌
        await readGameResultList();
    }

    public async Task<List<GameResult>> readGameResultList()
    {
        //db 에서 데이터 긁어와서 _gameResultList 에 넣어줌
        _gameResultList = await RankingService.GetGameResultAsync();
        return _gameResultList;
    }


    public void AddGameResult()
    {
        _showPopup = true;
        //Add new gameresult to
        _gameResult = new GameResult()
        {
            Id = 0
        };
    }

    //ClosePopup
    void ClosePopup()
    {
        _showPopup = false;
    }


    void EditGameResult(GameResult gameResult)
    {
        _showPopup = true;
        _gameResult = gameResult;
    }

    async Task DeleteGameResult(GameResult gameResult)
    {
        var result = RankingService.DeleteGameResult(gameResult);
        await readGameResultList();
    }


    async Task SaveGameResult()
    {
        //새로 만드는 상태
        if(_gameResult.Id==0)
        {
            //save to db
            _gameResult.Date = DateTime.Now;
            var result = RankingService.AddGameResult(_gameResult);
            //close popup
            ClosePopup();
        }
        else
        {
            //수정하고 있는 상태
            var result = RankingService.UpdateGameResult(_gameResult);
        }

        await readGameResultList();
        _showPopup = false;
    }


}
@page "/ranking"
@using RankingApp.Data.Models;
@using RankingApp.Data.Services;

@inject RankingService RankingService

<h3>Ranking</h3>

<AuthorizeView>
    <Authorized>

        @if (_gameResultLIst == null)
        {
            <p>Loading...</p>
        }else{
            <table class="table">
                <thead>
                    <tr>
                        <th>UserName</th>
                        <th>Score</th>
                        <th>Date</th>
                    </tr>
                </thead>
                <tbody>
                    @foreach (var gameResult in _gameResultLIst)
                    {
                        <tr>
                            <td>@gameResult.UserName</td>
                            <td>@gameResult.Score</td>
                            <td>@gameResult.Date</td>
                        </tr>
                    }
                </tbody>
            </table>
            <p>
                <!-- make button to add gameresult -->
                <button class="btn btn-primary" @onclick="AddGameResult">
                    Add
                    </button>
            </p>


            @if(_showPopup)
            {
                //dialog to show gameresult
                <div class="modal" style="display:block" role="dialog">
                    <div class="modal-dialog">
                        <div class="modal-content">
                            <div class="modal-header"></div>
                            <h3 class="modal-title">Add/Update Game Result</h3>

                            <button type="button" class="close" @onclick="ClosePopup">
                                <span aria-hidden="true">X</span>
                            </button>
                            <div class="modal-body">
                                <label for="UserName"> UserName</label>
                                <input class="form-control" type="text" placeholder="UserName" @bind-value="_gameResult.UserName" />
                                <label for="Score"> Score</label>
                                <input class="form-control" type="text" placeholder="Score" @bind-value="_gameResult.Score" />

                                <button class="btn-primary" @onclick="SaveGameResult">Save</button>
                            </div>
                        </div>
                    </div>
                </div>

            }
        }

    </Authorized>
    <NotAuthorized>
        인증 안됨(로그인 안됨)
    </NotAuthorized>

</AuthorizeView>

@code {
    List<GameResult> _gameResultLIst;

    GameResult _gameResult;

    bool _showPopup = false;

    protected override async Task OnInitializedAsync()
    {
        //db 에서 데이터 긁어와서 _gameResults 에 넣어줌
        await readGameResults();
    }

    public async Task<List<GameResult>> readGameResults()
    {
        //db 에서 데이터 긁어와서 _gameResults 에 넣어줌
        _gameResultLIst = await RankingService.GetGameResultAsync();
        return _gameResultLIst;
    }


    public void AddGameResult()
    {
        _showPopup = true;
        //Add new gameresult to
        _gameResult = new GameResult()
        {
            Id = 0
        };
    }

    //ClosePopup
    void ClosePopup()
    {
        _showPopup = false;
    }

    async Task SaveGameResult()
    {
        //새로 만드는 상태
        if(_gameResult.Id==0)
        {
            //save to db
            _gameResult.Date = DateTime.Now;
            var result = RankingService.AddGameResult(_gameResult);
            //close popup
            ClosePopup();
        }
        else
        {
            //수정하고 있는 상태

        }

        _gameResultLIst = await readGameResults();
    }
}
RankingService.cs
using RankingApp.Data.Models;
using System.Collections.Generic;
using System.Linq;
using System.Threading.Tasks;

namespace RankingApp.Data.Services
{
    public class RankingService
    {
        ApplicationDbContext _context;

        public RankingService(ApplicationDbContext context)
        {
            _context = context;
        }

        public Task<List<GameResult>> GetGameResultAsync()
        {
            //DB 에서 GameResult 테이블의 모든 데이터를 가져온다
            List<GameResult> results = _context.GameResult.ToList();
            return Task.FromResult(results);
        }

        public Task<GameResult> AddGameResult(GameResult gameResult)
        {
            _context.GameResult.Add(gameResult);
            _context.SaveChanges(); //db 에 실제 저장이 됨
            return Task.FromResult(gameResult);
        }

    }
}
AddGameResult() 함수가 추가 되었고
_context.GameResult.Add(gameResult);
_context.SaveChanges(); //db 에 실제 저장이 됨
이 코드가 실제 DB 에 저장하는 부분이 된다
이후 결과는 Task 로 리턴해주고 결과를 담을때는 FromResult 로 결과를 담아줘서 리턴하면 await 으로 결과를 기다 릴 수 있다
    public async Task<List<GameResult>> readGameResults()
    {
        //db 에서 데이터 긁어와서 _gameResults 에 넣어줌
        _gameResultLIst = await RankingService.GetGameResultAsync();
        return _gameResultLIst;
    }
PM> add-migration anyName 으로 DB를 마이그레이션 할때 DefaultConnection 에 잇는 Database=RankingDB
RankingDB 이 이름으로 DB 가 생성되게 된다
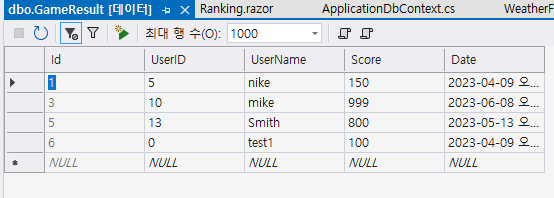
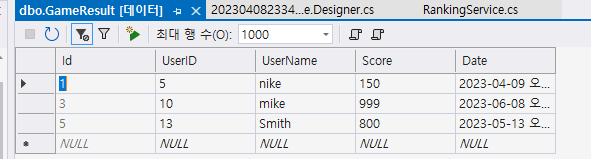
먼저 최종 작업한 화면은 다음과 같다
여기서 Entity = EntityFramework 는 ORM 같은 것이다
기본 Blazor Server 에서 Ranking 부분을 추가 한것이도 Fetch data 와는 다르게 데이터는 db 에서 읽어온다 그래서 미리 DB 에 데이터를 넣어 놓어 놓는 것으로 시작한다
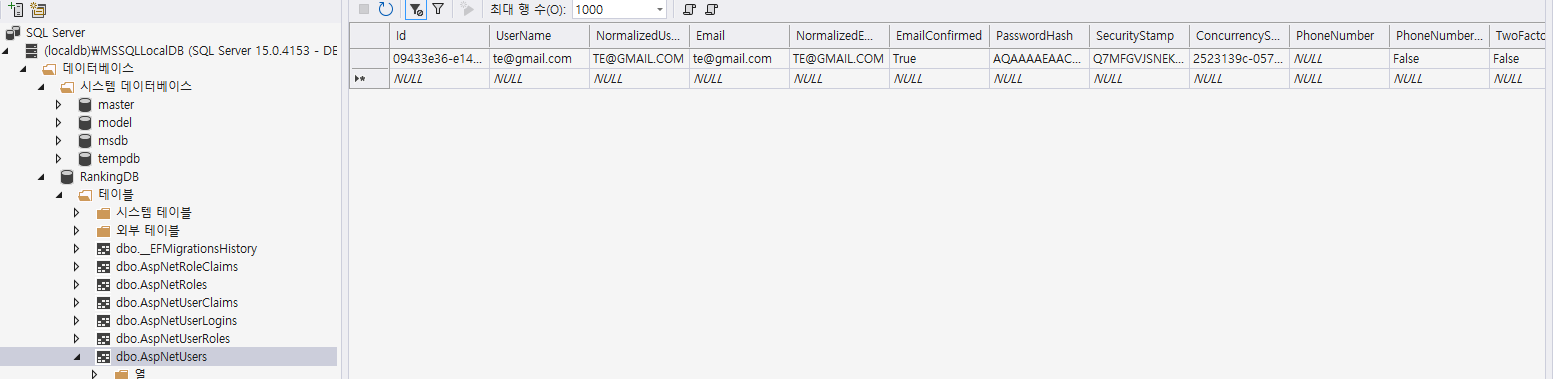
오른쪽 상단 Register 를 눌러 가입을 하나 하면 dbo.AspNetUsers 에 추저가 하나 추가 된다
그런 다음 EmailConfirmed 를 수동으로 true 로 변경한다 (이 부분은 이메일 확인 부분이다)
유저는 기본으로 제공된느 db 를 사용한다
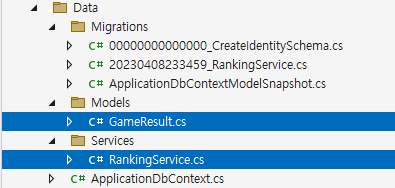
GameResult.cs 를 Modes 폴더를 하나 만들어추가한다(Services 로 마찬가지로 추가한다)
using System;
namespace RankingApp.Data.Models
{
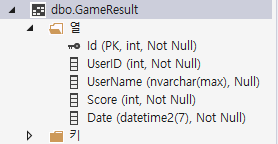
public class GameResult
{
public int Id { get; set; }
public int UserID { get; set; }
public string UserName { get; set; }
public int Score { get; set; }
public DateTime Date { get; set; }
}
}
원래는 GameResult 테이블을 하나 추가해 다음 처럼 데이터를 추가해야 하지만
이렇게 하지 않고 Entity 를 활용해 자동으로 테이블을 등록하게한다 => db에 대한 버전 관리도 되고 .cs 와 코드적으로 자동 연동 됨으로 이것이 편하다
ApplicationDbContext.cs 가 db 와 .cs 같에 연결해주는 핵심적인 부분이다
먼저 IdentityDbContext 를 상속받는다
DbSet<GameResult> 이 부분이 DB와 코드의 연결 부분이다
IdentityDbContext: Base class for the Entity Framework database context used for identity.
using Microsoft.AspNetCore.Identity.EntityFrameworkCore;
using Microsoft.EntityFrameworkCore;
using Microsoft.EntityFrameworkCore.Migrations;
using RankingApp.Data.Models;
using System;
using System.Collections.Generic;
using System.Text;

namespace RankingApp.Data
{
    public class ApplicationDbContext : IdentityDbContext
    {
        //DbSet 으로 추가해줘야지 GameReesult.cs 에서 GameResult 내용을 DB에 저장할 수 있다. ORM
        //즉 서버를띄울때 자동으로 DB를 갱신하여 띄워주게 된다
        //PM> add-migration RankingService  명령어르 NeGet 콘솔에서 실행하여 DB를 갱신해준다
        //PM> update-database 명령어르 NeGet 콘솔에서 실행하여 DB를 갱신해준다
        public DbSet<GameResult> GameResult { get; set; }

        public ApplicationDbContext(DbContextOptions<ApplicationDbContext> options)
            : base(options)
        {
        }
    }
}
이렇게 추가해주고
Startup.cs 에서
public void ConfigureServices(IServiceCollection services)
        {
            services.AddDbContext<ApplicationDbContext>(options =>
                options.UseSqlServer(
                    Configuration.GetConnectionString("DefaultConnection")));
이 부분을 통해 DB 로 연결하게 된다 (Identity 를 사용하기 때문에 이 부분이 자동으로 등록 되어 있긴 하지만 안되어 있으면 추가해준다)
using System;
using Microsoft.EntityFrameworkCore.Migrations;

namespace RankingApp.Data.Migrations
{
    public partial class RankingService : Migration
    {
        protected override void Up(MigrationBuilder migrationBuilder)
        {
            migrationBuilder.CreateTable(
                name: "GameResult",
                columns: table => new
                {
                    Id = table.Column<int>(nullable: false)
                        .Annotation("SqlServer:Identity", "1, 1"),
                    UserID = table.Column<int>(nullable: false),
                    UserName = table.Column<string>(nullable: true),
                    Score = table.Column<int>(nullable: false),
                    Date = table.Column<DateTime>(nullable: false)
                },
                constraints: table =>
                {
                    table.PrimaryKey("PK_GameResult", x => x.Id);
                });
        }

        protected override void Down(MigrationBuilder migrationBuilder)
        {
            migrationBuilder.DropTable(
                name: "GameResult");
        }
    }
}
즉 GameResult 를 알아서 해석하여 테이블을 만드는 코드가 된다
Up 일때는 들어가고 Down 일때는 Drop 하게된다 (버전 관리 개념)
이렇게 하지 않으면 DB 에서 Field 를 변경하거나 코드에서 Field 명등 수정 사항이 안맞는 상황들이 발생 할수 있기 때문에 번거로운 작업이 계속 될 수 있는데 이것을 코드수준에서 DB로 맞춰만들어주기 때문에 작업의 효율을 높여준다
이에 더해 버전 관리 또한 가능해지게 된다
데이터는 우선 수동으로 다음처럼 추가한다
데이터를 읽어오는 코드를 먼저 작업하자
그러기 위해서 ApplicationDbContext.cs 에서 다음 처럼
DbSet 을 통해서 DB 와 연결된 부분을 읽어와야 하는데 이미 위에서 다음과 같은 코드를 통해 연결을 해놨으니
public DbSet<GameResult> GameResult { get; set; }
RankingService.cs 서비스를 만들어 데이터를 가져올 수 있는 코드를 만들어 준면 된다
using RankingApp.Data.Models;
using System.Collections.Generic;
using System.Linq;
using System.Threading.Tasks;

namespace RankingApp.Data.Services
{
    public class RankingService
    {
        ApplicationDbContext _context;

        public RankingService(ApplicationDbContext context)
        {
            _context = context;
        }

        public Task<List<GameResult>> GetGameResultAsync()
        {
            //DB 에서 GameResult 테이블의 모든 데이터를 가져온다
            List<GameResult> results = _context.GameResult.ToList();
            return Task.FromResult(results);
        }

    }
}
이 코드를 통해 db 에 있는 GameResult 테이블 내용을 읽어올 수 있게 된다
그리고 RankingService 를 사용하기 위해서 Startup.cs 에 AddScoped 로 RankigService 를 추가해준다
public class SingletonService : IDisposable
{
public Guid ID {get; set;} //간단하게 ID를 생성하는 인터페이스이다.

public SingletonService() //cotr + tab,tab으로 해당 class의 생성자를 간단하게 생성할 수 있다.
{
ID = Guid.NewGuid();
}

public Dispose()
{
Console.WriteLine("SingletonService Disposed!");
}
}

public class TransientService : IDisposable
{

public Guid ID {get; set;} //간단하게 ID를 생성하는 인터페이스이다.

public TransientService() //cotr + tab,tab으로 해당 class의 생성자를 간단하게 생성할 수 있다.
{
ID = Guid.NewGuid();
}

public Dispose()
{
Console.WriteLine("TransientService Disposed!");
}
}

public class ScopeService : IDisposable
{
public Guid ID {get; set;} //간단하게 ID를 생성하는 인터페이스이다.

public ScopeService() //cotr + tab,tab으로 해당 class의 생성자를 간단하게 생성할 수 있다.
{
ID = Guid.NewGuid();
}

public Dispose()
{
Console.WriteLine("ScopeService Disposed!");
}

}
using HelloEmpty.Models;
using Microsoft.AspNetCore.Http;
using Microsoft.AspNetCore.Mvc;
using System.Collections.Generic;

namespace HelloEmpty.controllers
{
    [Route("api/[controller]")]
    [ApiController]
    public class ValuesController : ControllerBase
    {
        [HttpGet]
        public List<HelloMessage> Get()
        {
            List<HelloMessage> message = new List<HelloMessage>();
            message.Add(new HelloMessage() { Message = "Hello Web API 1!" });
            message.Add(new HelloMessage() { Message = "Hello Web API 2!" });
            message.Add(new HelloMessage() { Message = "Hello Web API 3!" });
            return message;
        }
    }
}
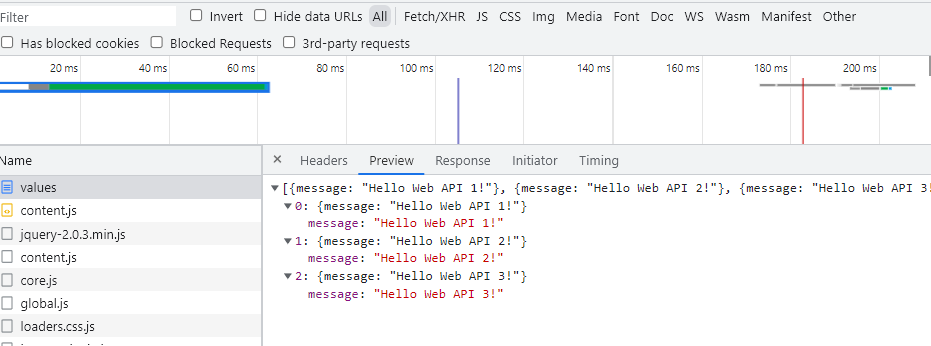
get() 이 클라에서 서버로 api/Values 경로로 api 를 쏘면
서버에서 보낼 내용을 message 에 담아 브라우저에 보낸다
HelloMessage
namespace HelloEmpty.Models
{
    public class HelloMessage
    {
        public string Message { get; set; }
    }
}
실제 데이터는 Models 에 들어있게 된다
program 부분인데 이 부분은 디폴트이다
using Microsoft.AspNetCore.Hosting;
using Microsoft.Extensions.Configuration;
using Microsoft.Extensions.Hosting;
using Microsoft.Extensions.Logging;
using System;
using System.Collections.Generic;
using System.Linq;
using System.Threading.Tasks;

namespace HelloEmpty
{
    public class Program
    {
        public static void Main(string[] args)
        {
            CreateHostBuilder(args).Build().Run();
        }

        public static IHostBuilder CreateHostBuilder(string[] args) =>
            Host.CreateDefaultBuilder(args)
                .ConfigureWebHostDefaults(webBuilder =>
                {
                    webBuilder.UseStartup<Startup>();
                });
    }
}
Startup.cs
using Microsoft.AspNetCore.Builder;
using Microsoft.AspNetCore.Hosting;
using Microsoft.AspNetCore.Http;
using Microsoft.Extensions.DependencyInjection;
using Microsoft.Extensions.Hosting;
using System;
using System.Collections.Generic;
using System.Linq;
using System.Threading.Tasks;

namespace HelloEmpty
{
    public class Startup
    {
        // This method gets called by the runtime. Use this method to add services to the container.
        // For more information on how to configure your application, visit https://go.microsoft.com/fwlink/?LinkID=398940
        public void ConfigureServices(IServiceCollection services)
        {
            //mvc 를 사용하겠다는 것
            //services.AddControllersWithViews();
            services.AddControllers();
        }

        // This method gets called by the runtime. Use this method to configure the HTTP request pipeline.
        public void Configure(IApplicationBuilder app, IWebHostEnvironment env)
        {
            if (env.IsDevelopment())
            {
                app.UseDeveloperExceptionPage();
            }

            app.UseRouting();


            //홈페이지 실행할때 어떤 주소로 어떤 부분을 연동하여 실행할지에 대한 부분
            app.UseEndpoints(endpoints =>
            {
                endpoints.MapControllers();
                //endpoints.MapRazorPages();
                //endpoints.MapControllerRoute(name: "default", pattern: "{controller=Home}/{action=Index}/{id?}");
                /*
                endpoints.MapGet("/", async context =>
                {
                    await context.Response.WriteAsync("Hello World!");
                });
                */
            });
        }
    }
}
우리는 웹 어플리케이션을 개발할 때, 보통 java, .NET, Node.js 등의 framework 또는 language를 사용하여 server-side project를 만든다. 그리고 Angular, React, Vue.js와 같은 javascript framework를 사용하여 브라우저에 데이터를 보여준다.
하지만, 우리는 server-side application에서 사용한 언어를 client-side에는 사용할 수가 없다. server-side와 client-side는 기본적으로 단절되어있다.
우리가 만약, server language를 client에도 재사용한다면 좋지 않겠는가? 우리는 WebAssembly를 사용하여 그렇게 할 수 있다.
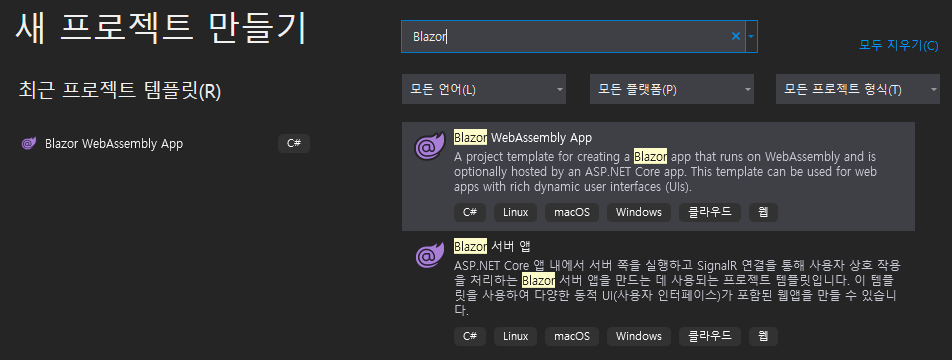
Blazor는 무엇이고, 어떻게 사용해야 하는가?
Blazor는 C#을 사용하여 interactive web application을 만들 수 있는 오픈소스 framework이다. 우리는 Blazor에서 server, client code에 모두 C#을 사용할 수 있다. .NET runtime은 브라우저에서 우리가 생성한 .NET DLL을 실행할 수 있다.
추가적인 plugin없이 주요 브라우저에서 실행이 가능하다. .NET standard와 호환하는 library를 사용할 수 있다. (NuGet package 포함)
JavaScript와의 연결이 되어 있으므로, web sockets, file API, DOM의 브라우저 기능을 사용할 수 있다.
Blazor application에서 JavaScript를 호출할 수 있고, 그 반대도 가능하다.
Blazor Application의 Different Models
Blazor Server
Blazor Server는 ASP.NET Core application의 server측에서만 동작하고, SignalR을 사용하여 HTML과 통신한다. blazor.server.js라는 파일을 통해 가능하다.
server-side application은 메모리에 남아있기 때문에, 사용자당 instance가 생성된다.
장점은, Blazor WebAssembly에 비해 다운로드 사이즈가 작다. older browser에서도 디버깅이 가능하다.
단점은, 서버와 연결되어 있어야 하기 때문에 offline support는 없다. 확장성도 리스크가 될 수 있지만, 동시접속 천단위까지 제공이 가능하다. 마지막으로, serverless deployment는 불가능하며, ASP.NET Core server가 반드시 필요하다.
Blazor WebAssembly
WebAssembly의 도움으로 브라우저 client에서 실행된다. application이 실행되면 browser로 모든 파일을 다운받는다. (HTML, CSS, JavaScript files, .NET Standard DLL files)
offline mode에서 동작한다. server가 필요하지 않다. static files로 구성되어 있기 때문에, CDN, Server, Azure Storage에 배포가 가능하다.
장점은, native browser application의 속도와 비슷한 정도로 빠르다. offline mode에서 동작이 가능하다. serverless deployment가 가능하다. browser로 file만 받으면, server는 필요하지 않다. 추가 plugin 없이, modern browser에서 동작이 가능하다. 배포가 쉽다.
브라우저에서만 실행되기 때문에, 브라우저 capability에 의해 성능이 제한된다.
단점은 최초 로딩시간이 길다. older browser에서는 동작하지 않는다. older browser에서 동작해야 한다면 Blazor server-side application이 더 나은 선택이 되겠다.