그렇다면 해당 Delegate를 등록받는 onClick 이라는 녀석은 무엇일까? 바로 이 onClick이 UnityEventBase를 상속받는 UnityEvent 클래스의 Instance이다. 즉, 이 Class의 Instance에 UnityAction을 Register하는 것이다. 그런 다음 해당 클래스의 Invoke 메소드가 호출되면서 모든 등록된 Delegate들이 실행되게 된다.
위 코드에서 A키를 8회 눌렀을 때 출력은 아래와 같다. 순서대로 찍히고 마지막에 다 찍힌다.
1
2
3
4
5
6
7
8
9
10
11
12
13
14
15
16
1>Air
2>Baby
3>Cat
4>Do
5>Ear
6>Fly
7>Good
8>Air
Baby
Cat
Do
Ear
Fly
Good
동일한 기능을 하는 코드를 UnityEvent와 UnityAction을 이용하면 아래와 같이 구현할 수 있다.
1
2
3
4
5
6
7
8
9
10
11
12
13
14
15
16
17
18
19
20
21
22
23
24
25
26
27
28
29
30
31
32
33
34
35
36
37
38
39
40
41
42
43
44
45
46
47
48
49
50
51
52
53
54
55
using UnityEngine;
using System.Collections;
using UnityEngine.Events;
using UnityEngine.UI;
publicclassUnityEventTest:MonoBehaviour{
publicUnityAction _unityAction;
publicUnityEvent[]_event=newUnityEvent[8];
intstate=0;
voidStart()
{
//create unityaction delegate
UnityAction[]action=newUnityAction[8];
action[0]=newUnityAction(FuncA);
action[1]=newUnityAction(FuncB);
action[2]=newUnityAction(FuncC);
action[3]=newUnityAction(FuncD);
action[4]=newUnityAction(FuncE);
action[5]=newUnityAction(FuncF);
action[6]=newUnityAction(FuncG);
action[7]=newUnityAction(FuncA);
action[7]+=newUnityAction(FuncB);
action[7]+=newUnityAction(FuncC);
action[7]+=newUnityAction(FuncD);
action[7]+=newUnityAction(FuncE);
action[7]+=newUnityAction(FuncF);
action[7]+=newUnityAction(FuncG);
//register
for(inti=0;i<8;i++)
{
_event[i]=newUnityEvent();
_event[i].AddListener(action[i]);
}
}
voidUpdate()
{
if(Input.GetKeyDown(KeyCode.A))
{
_event[state].Invoke();
state=(++state>7)?0:state;
}
}
publicvoidFuncA(){Debug.Log("Air");}
publicvoidFuncB(){Debug.Log("Baby");}
publicvoidFuncC(){Debug.Log("Cat");}
publicvoidFuncD(){Debug.Log("Do");}
publicvoidFuncE(){Debug.Log("Ear");}
publicvoidFuncF(){Debug.Log("Fly");}
publicvoidFuncG(){Debug.Log("Good");}
}
이렇게 하면 코드량은 조금 더 길어 보일 지 모르나, 각 이벤트에 등록된 UnityAction의 추가(AddListener) 및 삭제(RemoveListener)가 동적으로 자유로우므로, 마치 Observer Pattern을 적용한 느낌도 나면서 훨씬 더 유연한 코드 작성이 가능하다. (사실 UnityEvent는 미리 구현하여 내장된 Observer Pattern으로 보는 것이 맞을 것이다.)
아래와 같이 추상 클래스인 UnityEvent<T0>를 상속하여 선언함으로써 인자를 넘겨 주는 타입의 UnityAction을 호출할 수도 있다. 인자를 4개 받는 것까지 확장 가능하다.
1
2
3
4
5
6
7
8
9
10
11
12
13
14
15
16
17
18
19
20
21
22
23
24
25
26
27
28
29
30
31
32
33
34
35
36
37
38
39
40
41
42
43
44
45
46
47
48
49
50
51
52
publicclassMyEvent:UnityEvent<int>{}
publicclassUnityEventTest:MonoBehaviour{
publicUnityAction<int>_unityAction;
publicMyEvent[]_event=newMyEvent[8];
intstate=0;
voidStart()
{
//create unityaction delegate
UnityAction<int>[]action=newUnityAction<int>[8];
action[0]=newUnityAction<int>(FuncA);
action[1]=newUnityAction<int>(FuncB);
action[2]=newUnityAction<int>(FuncC);
action[3]=newUnityAction<int>(FuncD);
action[4]=newUnityAction<int>(FuncE);
action[5]=newUnityAction<int>(FuncF);
action[6]=newUnityAction<int>(FuncG);
action[7]=newUnityAction<int>(FuncA);
action[7]+=newUnityAction<int>(FuncB);
action[7]+=newUnityAction<int>(FuncC);
action[7]+=newUnityAction<int>(FuncD);
action[7]+=newUnityAction<int>(FuncE);
action[7]+=newUnityAction<int>(FuncF);
action[7]+=newUnityAction<int>(FuncG);
//register
for(inti=0;i<8;i++)
{
_event[i]=newMyEvent();
_event[i].AddListener(action[i]);
}
}
voidUpdate()
{
if(Input.GetKeyDown(KeyCode.A))
{
_event[state].Invoke(100);
state=(++state>7)?0:state;
}
}
publicvoidFuncA(intcnt){Debug.Log("Air:"+cnt);}
publicvoidFuncB(intcnt){Debug.Log("Baby:"+cnt);}
publicvoidFuncC(intcnt){Debug.Log("Cat:"+cnt);}
publicvoidFuncD(intcnt){Debug.Log("Do:"+cnt);}
publicvoidFuncE(intcnt){Debug.Log("Ear:"+cnt);}
publicvoidFuncF(intcnt){Debug.Log("Fly:"+cnt);}
publicvoidFuncG(intcnt){Debug.Log("Good:"+cnt);}
}
Unity에서 사용하는 Mono 2.x는 C# 3.0까지는 안전하게 지원하므로, C# 3.0 버젼의 Lambda를 이용할 수 있다. Lambda expression은 anonymous function의 일종으로 이를 이용하면 간단히 delegate를 생성 가능하다. 따라서, 아래와 같이 동일 기능을 더 간단히 구현할 수 있다. Lambda 정의 Ref
씬을 비동기 로딩하면서 progressbar 로 상태를 표시하고 싶을때 allowSceneActivation = false 로
로딩할 씬이 실제 활성화 될때까지 기다리게 할 수 있고 AsyncOperation.progress 값이0.9 가 될때
allowSceneActivation = true 로 변경하게되면 isDone 이 true 로 변경되며 AsyncOperation.progress 또한
1.0f 로 되어 비동기 로딩처리를 할 수 있다
Allow scenes to be activated as soon as it is ready.
When used in combination with LoadLevelAsync & LoadLevelAdditiveAsync it allows you to delay the actual activation of the scene. (And unloading of the previous scene).
기본 설정으로, 스크립트 컴포넌트는 플레이 모드에서만 동작하도록 설정되어 있습니다. 이 어트리뷰트(attribute)를 추가 하면, 각 스크립트 컴포넌트들 역시 플레이모드가 아닌 에디터 모드에서 해당 콜백 함수를 수행할 수 있습니다.
The functions are not called constantly like they are in play mode. - Update is only called when something in the scene changed. - OnGUI is called when the Game View recieves an Event. - 씬뷰 또는 게임뷰에서 repaint호출이 있을 때 마다 OnRenderObject 와 또다른 렌더링 콜백 함수들이 호출됩니다.
RequireComponent를 사용하는 스크립트를 추가하면, 요구되는 컴포너트가 자동으로 해당 게임오브젝트에 추가됩니다. 설정 오류를 피하는 데 유용합니다. 예를 들어, 리지드 바디가 요구되는 스크립트가, 항상 같은 게임오브젝트에 첨부되는 경우. RequireComponent를 사용하면 이 작업이 자동으로 이루어 지기 때문에, 설정에 대한 실수를 할 염려가 없습니다. Note that RequireComponent only checks for missing dependencies during the moment the component is added to a GameObject. Existing instances of the component whose GameObject lacks the new dependencies will not have those dependencies automatically added.
Why does Unity want me to set up Input Button "Submit", although I don't actually use it? It started after I removed all default inputs, save those that I use in my game. Does Unity use some of them in some behind the curtain processes?
If you are using the new UI, there is typically an EventSystem object in the scene. It has a component called the StandAloneInputModule that has a Submit button specified by default in its setting.
public bool IsPointerOverGameObject (int pointerId);
Parameters
pointerId
Pointer (touch / mouse) ID.
Description
Is the pointer with the given ID over an EventSystem object?
using UnityEngine;
using System.Collections;
using UnityEngine.EventSystems;

public class MouseExample : MonoBehaviour
{
    void Update()
    {
        // Check if the left mouse button was clicked
        if (Input.GetMouseButtonDown(0))
        {
            // Check if the mouse was clicked over a UI element
            if (EventSystem.current.IsPointerOverGameObject())
            {
                Debug.Log("Clicked on the UI");
            }
        }
    }
}
using UnityEngine;
using System.Collections;
using UnityEngine.EventSystems;
If you use IsPointerOverGameObject() without a parameter, it points to the "left mouse button" (pointerId = -1); therefore when you use IsPointerOverGameObject for touch, you should consider passing a pointerId to it.
Note that for touch, IsPointerOverGameObject should be used with OnMouseDown() or Input.GetMouseButtonDown(0) or Input.GetTouch(0).phase == TouchPhase.Began.
매개 변수없이 IsPointerOverGameObject()를 사용하면 "마우스 왼쪽 버튼"(pointerId = -1)을 가리 킵니다. 따라서 touch에 IsPointerOverGameObject를 사용할 때는 pointerId를 전달하는 것을 고려해야합니다.
touch의 경우 IsPointerOverGameObject는 OnMouseDown () 또는 Input.GetMouseButtonDown (0) 또는 Input.GetTouch (0) .phase == TouchPhase.Began과 함께 사용해야합니다.
오버로드는 다음처럼 정의되어있다
//
// 요약:
// ///
// Is the pointer with the given ID over an EventSystem object?
// ///
//
// 매개 변수:
// pointerId:
// Pointer (touch / mouse) ID.
public bool IsPointerOverGameObject(int pointerId);
//
// 요약:
// ///
// Is the pointer with the given ID over an EventSystem object?
if Lightmap size is more bigger than previous it, you should check following options.
Lightmap settings
Property:
Function:
Scale in Lightmap
This value specifies the relative size of the object’s UVs within a lightmap. A value of 0 will result in the object not being lightmapped, but still contribute to lighting other objects in the scene. A value greater than 1.0 increases the number of pixels (ie, the lightmap resolution) used for this object while a value less than 1.0 decreases it. You can use this property to optimise lightmaps so that important and detailed areas are more accurately lit. For example: an isolated building with flat, dark walls will use a low lightmap scale (less than 1.0) while a collection of colourful motorcycles displayed close together warrant a high scale value.
Prioritize illumination
Check this box to tell Unity to always include this object in lighting calculations. Useful for objects that are strongly emissive to make sure that other objects will be illuminated by this object.
Lightmap Parameters
Allows you to choose or create a set of Lightmap Parameters for the this object.
Unity3d에서 소개한 사용 방법과는 조금 다른데요. Unity3D에서는 CombineMeshes를 호출 하기 전에 mesh를 New 하는 과정이 있는데, 제 코드에서는 Merge할 때 new Mesh 하지 않고, 기존 MeshFilter의 Mesh의 Clear() 함수를 해주고 그대로 재 사용 했습니다. Merge 할 때 마다 new Mesh 해버리면 VBO가 계속 올라가고 줄어들지 않는 현상이 생겨 버리더군요. 자원 관리자에서 메모리를 봐도 상당히 많은 양의 메모리가 지속적으로 증가하는 것을 확인 할 수 있었습니다. 언제나 그렇듯 이유는 잘 모르겠구요.
Shader error: Material doesn't have stencil properties ??
This is a new shader error for us with Unity 5:
Material doesn't have stencil properties
What is causing this? We are using a stencil buffer in the shader but AFAIK there is nothing else in the Unity docs that talk about a stencil property.
저런 에러(워닝)가 뜨면 아래 코드를 붙여넣으면 된다
(answering my own question)
There seems to be a magic property called _Stencil, which is supposed to be used for the unique stencil buffer id.
_Stencil ("Stencil Ref", Float) = 0
in full ...
// these six unused properties are required when a shader
// is used in the UI system, or you get a warning.
So I'm using the UI-default shader as a starting point for my sprite shader, and if I have the _ColorMask property my sprite doesn't render at all. Removing the property allows the sprite to render but then it doesn't clip properly. Even if I remove the code where the color mask is being used, just having the property still breaks the shader.
I would recommend using the Sprites-Default or Sprites-Diffuse shader as a basis - why use UI-default? Without seeing your code, can't really suggest anything else
2017.3 completes the 2017 cycle introducing several new features and improvements across the board for both artists and developers.
We’re excited to share all the great new and improved features available today with Unity 2017.3. Before drilling down into the details, though, we wanted to look back at Unity 2017. (If you can’t wait, just jump straight to the What’s new section below.)
With the new Unity 2017 cycle, we doubled down on our effort to help artists, designers and developers create and collaborate more efficiently. Powerful visual tools like Timeline, Cinemachine and Unity FBX Exporter free artists to do more.
We continued to improve graphics quality and runtime performance to help you stay ahead of the curve on the latest emerging platforms (desktop, console, mobile, VR, AR, smart TVs) and to take advantage of the latest GPU and native Graphics APIs. A great example of this is the award-winning Adam demo-film series.
Other features, like the updated 2D tools and Unity Teams, help you get better results, faster. Finally, we’ve given you new ways to use powerful data (in the Ads, IAP and Live-Ops Analytics solutions) to optimize game performance in real-time and maximize your revenue.
Unity 2017.1, 2017.2 and 2017.3 delivered many key features supporting these goals. Here’s a summarized recap:
We’re also excited to share some of the Unity 2017.x productions released or in progress:
Oats Studios / ADAM: The Mirror & Episode 3
Spiraloid / Nanite Fulcrum
KO_OP / GNOG
Baobab Studio / Asteroid!
EpicHouse Studios / Phased
Cybernetic Walrus / Antigraviator
Rebel Twin / Dragons Hill 2
Slow Bros / Harold Halibut
WITHIN / Life of Us
Seriously / Best Fiends
Monomi Park / Slime Rancher
Videogyan / TooToo Boy
And finally before jumping to 2017.3 details, check out this highlight video of Unity 2017.x titles and some of the new & improved features:
What’s new in Unity 2017.3
As the year comes to an end, we are happy to announce that Unity 2017.3, the final release in our 2017 cycle, is now available. 2017.3 introduces several new features and improvements across the board for both artists and developers, and we’re particularly excited about sharing our improved toolset for creating interactive 360-video experiences.
We’re finishing 2017 strong with a huge change log of new features, including the following highlights:
Panoramic 360/180 video
We are particularly excited to bring you improvements to panoramic 360/180 and 2D/3D video workflows. You can now easily bring in various styles of 2D or 3D video in Unity and play it back on the Skybox to create 360-video experiences targeting standalone, mobile and XR runtimes.
Particle System improvements
Improvements include new Unlit and Surface particle shaders and ribbonized particle trails. These allow particles to be connected based on their age. Since each point on these ribbonized trails is represented by a particle, they can be animated, for example, by using them in conjunction with the Noise Module.
You will be able to define your own managed assemblies based on scripts inside a folder. By splitting your project’s scripts into multiple assemblies, script compilation times in the editor can be greatly reduced for large projects. Managed Memory Profiler support You can now take advantage of Mono/.NET 2.0 support for the APIs required to take managed memory snapshots. This makes it possible to take memory snapshots directly inside the editor.
The updated Crunch Library
The Crunch Library can now compress DXT textures up to 2.5 times faster, while providing about 10% better compression ratio. But more importantly, the updated library is now capable of compressing ETC_RGB4 and ETC2_RGBA8 textures, which makes it possible to use Crunch compression on iOS and Android devices.
Graphics improvements
There is now support for HDR compressed lightmaps (BC6H) on PC, Xbox One and PlayStation 4. We also made a number of GPU instancing improvements, and we’re adding Dynamic Resolution as an engine feature debuting on the Xbox One platform with other platforms to follow later.
Lighting improvements
We are introducing Lighting modes for the Progressive Lightmapper (Baked Indirect, Shadowmask and Subtractive), LOD support with realtime probes providing a more intuitive workflow, and HDR encoding support for baked lightmaps for higher visual quality.
VR device info
To help you optimize VR experiences, you can now capture VR-device refresh rate, dimensions, aspect ratio, HMD-tracking and controller-tracking as part of device info and device status events.
Physics
Improvements include cloth self-collision and inter-collision technology and improved constraint painting.
Animation
We are introducing Playable scheduling, which allows you to prefetch the data before it is actually played. The first implementation affects AudioClipPlayables, but in the future, the scheduling will be used by other assets: audio, video and timeline. We added support for integer and enum animation parameters defined within an Animator Controller. This enables you to access and assign values from scripts giving you even better control over the flow of the animation state machine. We are also introducing a New “2D” mode button in the animation Preview window. Finally, it is now possible to zoom, frame and autofit in the Animator window!
Xbox One X Support
We added support for the new Xbox One X console from Microsoft. Use Quality Settings to enable support for 4K HDR rendering, or use the extra power in other ways such as improving framerate or increasing graphical fidelity. Xbox One X support is available in all 2017.x versions of Unity.
Xiaomi: easily publish Android apps into China (Xiaomi) through the editor.
In November 2016, Unity and Xiaomi announced a partnership to help developers bring games to Xiaomi’s 200 million customers in China, the largest Android store in this region. Since then a number of early-adopter games have gone live on Xiaomi’s store. At the end of November, the push-to-store service offering for Xiaomi’s brand-new portal went live! To get started, check out the FAQ and getting started guides on this site.
Standard Events
Standard Events is now officially out of beta, and you can access it directly from the Unity Editor in 2017.3. We’re also introducing funnel templates, which together with Standard Events, allow you to create common funnels that can reveal key insights with just a few clicks.
Editor/engine
Script compilation – Assembly definition files
Unity automatically defines how scripts compile to managed assemblies. Typically, compilation times in the Unity Editor for iterative script changes increase as you add more scripts to the Project increasing compilation time.
Now, you can use an assembly definition file to define your own managed assemblies based on the scripts in a folder. Separating project scripts into multiple assemblies with well-defined dependencies ensures that only the required assemblies are rebuilt when you make changes in a script. This reduces compilation times and is particularly useful for large projects.
Each managed assembly can be thought of as a single library within the Unity Project.
The figure above illustrates how to split the project scripts into several assemblies. Because only the scripts are changed in the Main.dll, none of the other assemblies are recompiled. And since the Main.dll contains fewer scripts, it compiles faster than the Assembly-CSharp.dll.
Similarly, script changes in only Stuff.dll cause Main.dll and Stuff.dll to recompile.
Back in 2015, we released an experimental managed memory profiler with support for IL2CPP. The memory profiler started as a Unity Hackweek project and was since released on BitBucket as an open source project. See the memory profiler project page on Bitbucket for details and a demo video.
We’ve added Mono/.NET 2.0 support for the APIs required by the memory profiler to take managed memory snapshots. This makes it possible to take memory snapshots inside in the editor.
Transform Tool
The Transform Tool is a multitool, that contains the functionality of the standard three: Move, Rotate and Scale tools. The Transform Tool is not meant to replace the three standard tools, but rather, to provide a tool for situations where you would want all of the three tools present without having to switch back and forth between them.
World gizmo
With the pivot rotation set to “Global” mode, you can translate and rotate the GameObject along the global axes.
Axis translation, Plane translation.
Axis rotation, Screen Space rotation, Free rotation.
Global scaling.
Local gizmo
When the pivot rotation is in “Local” mode, you can also scale along local axes.
Local axis scaling.
Screen Space Gizmo
If you keep the “SHIFT” key pressed, the gizmo enters Screen Space mode.
In this mode, you can translate and rotate in screen space.
Axis translation, Plane translation, Axis rotation and Global scaling.
Snapping
When you keep the “CTRL” (Win) or “Command” (OSX) key pressed, the unit snapping is activated for:
Axes translations
Plane translations
Axes rotations
Axes scaling
Global scaling
Plane translation, Axis translation, Global scaling, Axis rotation.
Vertex Snapping
When you keep the “V” key pressed, the gizmos enter Vertex Snapping mode.
This enables you to translate your gameobject so one of its vertexes is placed on the vertex of another object.
Cinemachine camera system
Cinemachine, our camera system for in-game cameras, cinematics, cutscenes, film pre-visualization and virtual cinematography, also includes a number of new features and improvements.
A new Collider implementation that replaces curb feelers with a clever camera-repositioning algorithm, which preserves camera height or distance from target
A New Framing Transposer that respects composition and framing rules by moving the camera without rotating it
The New Cinemachine MixingCamera, which drives a continuous blend of up to 8 virtual cameras from timeline or game logic. You can use it to create complex rigs with custom blends and expose them as ordinary vcams.
Other new features and improvements include dolly cam behavior and POV, a 1st-person shooter type, aim component, and much more.
For a complete list of all the features and improvements, check out our official forum thread.
The Cinemachine feature set is distributed via the Asset Store. Download the latest version to your project.
Graphics
Progressive Lightmapper (preview)
Lighting modes support
In Unity, it is possible to control lighting pre-computation and composition in order to achieve a given effect by assigning various modes to a Light (Realtime, Mixed and Baked). Using Mixed mode significantly reduces realtime shadow distance increasing performance. Higher visual fidelity can also be achieved as far distance shadows are supported along with realtime specular highlights.
In Unity 2017.3, you can do the same thing with the Progressive Lightmapper choosing from among the following Lighting modes:
In Baked Indirectmode, Mixed lights behave like realtime dynamic lights with additional indirect lighting sampled from baked lightmaps and light probes. Effects like fog can be used passed realtime shadow distance where shadowing would otherwise be missing.
In Shadowmaskmode, Mixed lights are realtime, and shadows cast from static objects are baked into a shadowmask texture and into light probes. This allows you to render shadows in the distance drastically reducing the amount of rendered shadow casters based on the Shadowmask Modefrom the quality settings.
In Subtractive mode, direct lighting is baked into the lightmaps, and static objects will not have specular or glossy highlights from mixed lights. Dynamic objects will be lit at realtime and receive precomputed shadows from static objects via light probes. The main directional light allows dynamic objects to cast a subtractive realtime shadow on static objects.
To try out the lighting modes in the Progressive Lightmapper, make sure that you have a Mixed Light in your scene and then, in the Lighting Window, select a Lighting Mode.
Light LODs with real-time probes and baked lightmaps
We’ve added the ability to generate lighting for level of detail (LOD) objects with real-time light probes in addition to baked lightmaps, offering a more intuitive workflow for users to author their lighting. The LOD allows you to have meshes in lower complexity when the camera is far away and higher complexity when the camera is closer. That way you can reduce the level of computation when rendering faraway objects. When you use Unity’s LOD system in a scene with baked lighting and Realtime GI, the system lights the most detailed model out of the LOD Group as if it is a regular static model. It uses lightmaps for the direct and indirect lighting, and separate lightmaps for Realtime GI.
However, for lower LODs in an LOD Group, you can only combine baked lightmaps with Realtime GI from Light Probes or Light Probe Proxy Volumes, which you must place around the LOD Group.
To allow the baking system to produce real-time or baked lightmaps in 2017.3, simply check that Lightmap Static is enabled in the Renderer component of the relevant GameObject.
This animation shows how realtime ambient color affects the Realtime GI used by lower level LODs:
HDR support in the lightmap pipeline
We’ve added support for HDR compressed lightmaps (BC6H) on PC, Xbox One and PlayStation 4 for achieving even better quality visuals. The advantage of using High Quality lightmaps is that they don’t encode lightmap values with RGBM, but use a 16-bit floating point value instead. As a result, the supported range goes from 0 to 65504. The BC6H format is also superior to DXT5 + RGBM combination as it doesn’t produce any of the banding artifacts associated with RGBM encoding and color artifacts coming from DXT compression. Shaders that need to sample HDR lightmaps are a few ALU instructions shorter because there is no need to decode the sampled values, and the BC6H format has the same GPU memory requirements as DXT5.
The HDR is easily enabled by setting the Lightmap Encoding option in the Player Settings to High Quality.
Choosing High Quality will enable HDR lightmap support, whereas Normal Quality will switch to RGBM encoding.
When lightmap Compression is enabled in the Lighting Window, the lightmaps will be compressed using the BC6H compression format.
GPU instancing improvements
GPU Instancing was introduced in 5.6 to reduce the number of draw calls used per scene by rendering multiple copies of the same Mesh simultaneously, and thus significantly improving rendering performance.
There are a number of improvements to GPU instancing, including Per-instance properties which are now packed into a structure data type with instancing constant buffer containing only one array of such structures.
For most platforms, the instancing array sizes are now calculated automatically and no longer need to be specified by user (maximum allowed constant buffer size/size of the above-mentioned structure type). Instancing batch sizes are therefore improved on OpenGL and Metal, and instancing shader variants compile much faster and potentially cost less in terms of CPU-GPU data bandwidth.
Crunch compression library update
The updated Crunch library, introduced in Unity 2017.3, can compress DXT textures up to 2.5 times faster with a 10% improvement in compression ratio. More importantly, the updated library is now capable of compressing ETC_RGB4 and ETC2_RGBA8 textures, which makes it possible to use Crunch compression on iOS and Android devices.
Crunch is a lossy texture compression format, which is normally used on top of DXT texture compression. Crunch compression helps to reduce the size of the textures in order to use less disk space and to speed up downloads. The original Crunch compression library, developed by Richard Geldreich, is available on GitHub. Support for Crunch texture format was first added in Unity 5.3 and in Unity 2017.3, we are now introducing an updated version of the Crunch compression library.
Textures compressed with Crunch are first decompressed to DXT and then uploaded to the GPU at runtime. Crunched textures not only use less space, but they can be also decompressed really fast. This makes the Crunch format very efficient for distributing textures. At the same time, Crunched textures can take quite a lot of time to compress, which is a major drawback when using Crunch (for a big project, compression of all the textures into Crunch format can take several hours in the Unity Editor).
This should help you reduce the build sizes of your mobile games, and thus make it easier to comply with App Store over-the-air size limitations, ultimately letting you reach a wider audience with your content.
To use Crunch compression on Android, iOS and tvOS platforms, you simply select either the “RGB Crunched ETC” or “RGBA Crunched ETC2” format for your textures in the Inspector window. If you enable the “Use Crunch Compression” option in the Default tab, all the textures on the Android platform will be compressed with ETC Crunch by default.
Below you can see examples of textures compressed with Crunch using default quality settings. Note that the artifacts on the final textures are introduced both by Crunch compression and selected GPU texture format (DXT or ETC).
Original image 24 bits/pixel
DXT 4 bits/pixel
Crunched DXT 1.24 bits/pixel
Original image 24 bits/pixel
ETC 4 bits/pixel
Crunched ETC 1.33 bits/pixel
If you are interested in knowing more about the updated Crunch texture compression library, visit this blog post, which includes more examples of size and performance comparison.
Dynamic Resolution debuting on Xbox One platform
As its name suggests, Dynamic Resolution refers to dynamically scaling some or all of the render targets to reduce workload on the GPU. Dynamic Resolution can be triggered automatically when performance data indicates that the game is about to drop frames due to being GPU bound. In such a case, gradually scaling down the resolution can help maintain a solid frame rate. It can also be triggered manually if the user is about to experience a particularly GPU intensive part of gameplay. If scaled gradually, Dynamic Resolution can be virtually unnoticeable.
360 Video Player
The new video player introduced earlier this year, made it possible to use 360 videos and make them truly interactive by adding CG objects, ambisonic audio, visual effects, and more.
In 2017.3, you can now bring a 2D or 3D 360-video into Unity and play it back on the Skybox to create standalone 360-video experiences targeting VR platforms.
Unity offers built-in support for both 180 and 360-degree videos in either an equirectangular layout (longitude and latitude) or a cubemap layout (6 frames).
Equirectangular 2D videos should have an aspect ratio of exactly 2:1 for 360-degree content, or 1:1 for 180-degree content.
Equirectangular 2D video
Cubemap 2D videos should have an aspect ratio of 1:6, 3:4, 4:3, or 6:1, depending on the face layout:
Cubemap 2D video
To use the panoramic video features in the Unity Editor, you must have access to panoramic video clips, or know how to author them. Check our documentation pages for a step-by-step guide on how to display any panoramic video in the Unity Editor.
Keep in mind that many desktop hardware video decoders are limited to 4K resolutions and mobile hardware video decoders are often limited to 2K or less, which affects the resolution of playback in real-time on those platforms.
ARCore SDK Preview 2 for Unity
Technical improvements introduced with the new developer preview include a C API for Android NDK, functionality to pause and resume AR sessions allowing users to pause and continue tracking after app is resumed, improved runtime efficiency and finally, improved trackable and anchor interface across anchor, plane finding, and point cloud. Learn more about ARCore Developer Preview.
Vuforia 7 support
With Unity 2017.3 support for Vuforia 7, you can build cross-platform AR apps. Vuforia 7 introduces Model Targets, a new way to place digital content on specific objects using pre-exiting 3D models. Also new is Vuforia Ground Plane, a capability that allows you to place digital content on a horizontal surface such as a floor or table. Ground Plane will support an expanding range of iOS and Android devices, taking advantage of platform enablers such as ARKit where available. Learn more about Vuforia in Unity 2017.
Ground Plane (available for free)place digital content on floors or tables.
Model Targets. Recognize a new class of objects based on their geometry used for example for placing AR content on top of industrial equipment, vehicles or home appliances.
OctaneRender for Unity now available from Otoy
We are excited to welcome OTOY’s path-traced GPU-accelerated render engine for the Unity Editor. OctaneRender for Unity is available for free, or at $20 or $60 for packages that unlock more GPUs and OctaneRender plugins for leading 3D authoring tools. Born on GPUs, OctaneRender is an unbiased render engine, tracing each ray of light in a scene with physics-grade precision to deliver unrivaled photorealism in CG and VFX. Octane Render for Unity works with Unity 2017.1 and above. Learn more about OctaneRender for Unity.
The Velocity over Lifetime module now contains a new curve, which allows particle speeds to be controlled over the duration of a particle’s lifetime. This makes it possible to change the speed of particles without affecting the direction they are traveling in. It also includes support for negative speeds, which is useful for creating gravity/vortex effects.
Standard Particle Shaders
We are releasing surface and unlit shaders for use with particles. They provide all the core particle functionality that you would expect, via a similar interface to our existing Standard Shader. It is now easy to configure blend modes, alpha testing thresholds, soft particle distances, and many more features. Support for blended flipbooks and distortion effects is also built in. The surface shader also makes it easy to support Normal Mapping and PBR lighting.
Ribbonized Particle Trails
There is a new option in the Trails Module called Ribbon Mode, which allows particles to be connected based on their age, allowing you to avoid each particle leaving trails behind it. Because each point on the trail is represented by a particle, it is possible to use this mode to create animated trails, for example, by using it in conjunction with the Noise Module.
Other Particle System improvements
When using meshes in the Shape Module, it is now possible to use meshes whose primitive type is Line or LineStrip. This makes it easy to spawn particles along lines, instead of only on the surface of a mesh.
Unity has added support for 32-bit meshes in Unity 2017.3, finally dropping the constraint for meshes to have 65,536 or fewer vertices. This support has been fully integrated for Particle Systems, meaning you can spawn on the surface of these new large meshes. Although it is likely to have high-performance costs, you can now render particle meshes with 32-bit indices as well.
We’ve also made some improvements to the editor in order to improve your workflow when authoring effects:
The debug checkboxes have been moved from the Inspector to the Scene View Overlay to make them more accessible (Resimulate and Show Bounds).
There is a new dropdown menu in the Scene View Overlay called “Simulate Layers,” which you can use to preview all looping effects, rather than only the selected ones. Use the Layer Mask to decide which effects to preview.
The Scene View FX dropdown menu has a new option for rendering Particle Systems. This allows you to show/hide Particle Systems as a way of decluttering your Scene view.
Cloth improvements
There are a number of improvements to Cloth physics, including better in-editor tools for authoring Cloth with more of PhysX internals exposed. This gives you more options for collisions, self-collisions, etc.
You can now paint constraints on to the cloth using a brush-based method and update. You can also enable intercollision to make different cloth objects collide.
You can find more information on how to get started using the cloth improvements here.
Platforms
Facebook segmented upload feature
There is now support for Facebook’s new segmented upload feature for Game Room. Previously, a single file with a max size of around 250MB was uploaded to Facebook. Now, only those parts that were changed are uploaded (divided into segments of 10 MB).
Unity has supported Facebook’s gaming desktop app, Game Room, since Unity 5.6. Supporting the Windows-native client allows players to experience both web games and native games built exclusively for the platform. Learn more about how to reach up to two billion users on Facebook.
XR
Oculus Dash Depth Support
Witch Oculus introducing its new Oculus Dash menu and UI in it’s latest Rift’s update, we have included Oculus Dash Depth support and exposed camera-depth information, so that Oculus Dash can partially occlude world-space overlays.
Terrain Trees for VR
We’ve added the possibility to use Unity’s terrain trees in VR experiences. Check the documentation for detailson populating your world with trees.
Stereo Instancing for PSVR
In 2017.2, we delivered Stereo Instancing for VR PC based platforms; we’re now expanding to PSVR. Stereo Instancing is an exciting rendering advancement that unlocks hardware optimizations for rendering stereo images. This means that developers will be able to do more while maintaining a smooth framerate
Deprecation of platforms
In order to focus our efforts latest versions of DirectX, Unity 2017.3 (both the Unity Editor and the Standalone player) will no longer support DirectX 9 (which was originally released in 2002). You can read more about how to continue to support Windows XP on our blog.
Finally, as originally announced in October 2017, Unity will no longer include Samsung Tizen and SmartTV from version 2017.3. However, Unity stills provides 12 months of support, including patches and security updates starting from the release of 2017.2 (October 12 2017). To get the latest info on Tizen and SmartTV for Unity, visit thepartner page for Samsung or contact Samsung directly at support@samsungdevelopers.com.
Unity Teams
Unity Teams features are now available for purchase, so teams of all sizes can save, share and sync their projects easily within Unity. Unity Teams Basic is free and is great for small teams that are just getting started. More features and capacity are available with Unity Teams Advanced, which starts at at $9 per month. You can add more team members, cloud storage, or more automated builds, paying only for what you need. Details at unity3d.com/teams.
If you’ve been using Unity Teams features (Collaborate, Cloud Build), you can upgrade to a paid subscription by January 9, 2018 to prevent interruption in service. Furthermore, it’s a great time to upgrade to Plus and Pro. All Unity Plus and Pro subscriptions that are active as of January 31, 2018, are entitled to Unity Teams Advanced at no additional cost. Learn more about this offer.
For Plus and Pro users, LiveStream now displays instantaneous metrics broken down over the preceding 30 minutes. IAP revenue is displayed when verified, making income reporting more accurate. There are also options for filtering New Installs, Sessions, and Verified IAP Revenue in the Activity view.
이 섹션에서는 씬에 NavMesh(네비 메쉬)를 만들고 NavMesh Agent(네비 메쉬 에이전트)와 NavMesh Obstacle(네비 메쉬의 장애물), Off-Mesh Link(오프-메쉬 링크)를 만드는 방법에 대한 자세한 내용을 알려드립니다.
The Navigation System allows you to create characters which can navigate the game world. It gives your characters the ability to understand that they need to take stairs to reach second floor, or to jump to get over a ditch. The Unity NavMesh system consists of the following pieces:
NavMesh (short for Navigation Mesh) is a data structure which describes the walkable surfaces of the game world and allows to find path from one walkable location to another in the game world. The data structure is built, or baked, automatically from your level geometry.
NavMesh Agent component help you to create characters which avoid each other while moving towards their goal. Agents reason about the game world using the NavMesh and they know how to avoid each other as well as moving obstacles.
Off-Mesh Link component allows you to incorporate navigation shortcuts which cannot be represented using a walkable surface. For example, jumping over a ditch or a fence, or opening a door before walking through it, can be all described as Off-mesh links.
NavMesh Obstacle component allows you to describe moving obstacles the agents should avoid while navigating the world. A barrel or a crate controlled by the physics system is a good example of an obstacle. While the obstacle is moving the agents do their best to avoid it, but once the obstacle becomes stationary it will carve a hole in the navmesh so that the agents can change their paths to steer around it, or if the stationary obstacle is blocking the path way, the agents can find a different route.
귀찮으니 구글 번역(번역 상태가 살짝 이상하지만 직역?된걸 생각하면서 보면 이해할 수 있을 정도입니다)
네비게이션 시스템을 사용하면 게임 세계를 탐색 할 수있는 캐릭터를 만들 수 있습니다. 그것은 당신의 캐릭터에게 그들이 2 층에 도착하기 위해 계단을 잡거나 도랑을 뛰어 넘기 위해 뛰어 올라야 할 필요가 있음을 이해하는 능력을줍니다. Unity NavMesh 시스템은 다음과 같이 구성됩니다.
NavMesh (Navigation Mesh의 약자)는 게임 세계의 걷기 좋은 표면을 설명하고 게임 세계에서 걷기 좋은 곳에서 다른 곳으로가는 길을 찾을 수있는 데이터 구조입니다. 데이터 구조는 레벨 지오메트리에서 자동으로 빌드되거나 구워집니다.
NavMesh Agent 구성 요소는 목표를 향해 움직이는 동안 서로를 피하는 문자를 만들 수 있도록 도와줍니다. 요원들은 NavMesh를 사용하여 게임 세계에 대해 논하고 그들은 서로를 피하고 움직이는 장애물을 피하는 방법을 알고 있습니다.
Off-Mesh Link 구성 요소를 사용하면 걷기 쉬운 표면을 사용하여 표현할 수없는 탐색 바로 가기를 통합 할 수 있습니다. 예를 들어 도랑이나 담장을 뛰어 넘거나 걸어 가기 전에 문을 여는 것은 모두 오프 메쉬 링크라고 할 수 있습니다.
NavMesh 장애물 구성 요소를 사용하면 세계를 탐색하는 동안 에이전트가 피해야하는 움직이는 장애물을 설명 할 수 있습니다. 물리 시스템에 의해 제어되는 배럴 또는 상자는 장애물의 좋은 예입니다. 장애물이 움직이는 동안 요원이 그것을 피하기 위해 최선을 다하고 있지만 일단 장애물이 정지하면 navmesh에 구멍을 뚫어 요원이 경로를 변경하여 주변을 조종하거나 고정 된 장애물로 인해 경로가 차단되는 경우 에이전트는 다른 경로를 찾을 수 있습니다.
우선 네이게이션 만들어보기
네비게이션을 적용할 오브젝트를 모두 선택 합시다.
인스펙터 창에 오른쪽 상단에 보면 Static이라고 있습니다.
그 옆에 세모 단추가 있는데 눌러서 Navigation Static을 눌러줍시다.
※ 구역을 만들기 위해서 지형을 미리 올려두어 계산하게끔 해야되기 때문에 필요한 과정입니다.
유니티 메뉴창 - > Window -> Navigation을 누르시면 오른쪽에 네비게이션 관련 창이 나옵니다.
그 창에 상단을 보시면
Object | Bake | Areas 가 있는데요
Bake를 눌러줍시다. ( 나머지 2개는 신경 안써도 됩니다.)
그러면 이미지와 같은 화면이 나옵니다.
이것이 무엇을 뜻하냐면은
간단히 말해서 '길'로 설정할 범위를 정하라는 겁니다.
Agent Radius: 길로 만들 땅의 반 지름의 크기는 어느정도? ( 값 만큼 외각 여백 결정. )
Agent Height: 어느 높이까지 허용할 거냐? ( 최대 등산 각도. 계단 높이에 영향을 줌 )
Max Slope : 경사는 어느 지점까지 길로 허용할 거냐?
Step Height: : 어느 높이까지 길로 만들거냐? ( 계단 높이. )
모든 셋팅이 다 끝났으면 오른쪽 제일 하단 Bake를 눌러줍시다.
오브젝트 위에 하늘색으로 칠해진곳이 '길'로 허용된 범위 입니다.
캐릭터는 저 범위만 돌아다닐수 있습니다.
플레이어가 될 캐릭터를 맵 맘에 드는곳에 적당히 배치 합니다.
플레이어 캐릭터가 길찾기(Navigation) 수행을 하려면 한 가지 컴포넌트가 필요합니다.
Nav Mesh Agent라는 컴포넌트인데요.
플레이어 캐릭터를 선택한 상태로
유니티 메뉴를 보시면 Component -> Navigation -> Nav Mesh Agent를 누르면
컴포넌트가 하나 추가 됩니다.
터치한 부분까지 캐릭터를 이동시키기 위한 스크립트도 필요한데요.
미리 만들어서 넣어놓읍시다.
컴포넌트의 속성을 보면 여러가지 나와있는데요
Agent Size
- Radius: 충돌 범위( 가로 )
- Height: 충돌 범위( 세로 )
- Base Offset : 기본 출력
Steering
- Speed: 길찾기 이동 수행 스피드 ( 캐릭터 이동 속력 )
- Angular Speed: 회전 스피드 ( 캐릭터 회전 속력 )
- Acceleration: 가속력.
- Stopping Distance: 정지 거리.
※ 캐릭터에 네비 메쉬 에이전트( Nav Mesh Agent) 컴포넌트를 추가하면 기존에 있던
콜라이더(Collider)의 범위는 포함되지 않고, 네비 메쉬 에이전트의 범위로 체크 됩니다.
바로 스크립트를 작성합시다.
설명은 스크립트를 참고합시다.
using UnityEngine;
using System.Collections;
public class Nav : MonoBehaviour
{
public Camera camera; // 카메라 정보를 얻어오기 위한 변수.
Animation Ani; // 애니메이션을 실행 해주기 위한 애니메이션 변수.
NavMeshAgent Navi; // 네비게이션을 사용하기 위한 네비게이션 변수.
void Awake()
{
Navi = GetComponent<NavMeshAgent>(); // 네비게이션에 대한 컴포넌트를 캐싱
Ani = GetComponent<Animation>(); // 애니메이션에 대한 컴포넌트를 캐싱
}
void Update()
{
PlayerTouchMove(); // 화면에 터치 했을 때 이동한다.
}
void PlayerTouchMove()
{
// 매계변수 - 0:왼쪽 1:오른쪽 2:휠
if (Input.GetMouseButton(0)) // 마우스 왼쪽 버튼을 게속 누르고 있다면.
{
Ray ray = camera.ScreenPointToRay(Input.mousePosition);
// 카메라가 바라보고있는 스크린에서 마우스 위치 정보를 ray에 저장.
RaycastHit Hit;
// 충돌에 대한 정보를 저장하기 위한 변수.
// (마우스 위치정보, 충돌에 대하여 값을 담을 변수, 마우스 위치 지점까지 레이저를 얼마만큼의 길이로 쏠것인가?)
if (Physics.Raycast(ray, out Hit, Mathf.Infinity))
{
Navi.SetDestination(Hit.point);
// 매계변수의 위치까지 이동 시켜준다.
}
}
// 네비게이션의 목표지점과 현재 캐릭터의 위치가 같으면 함수를 빠져나간다.
// 쓸때없는 연산을 줄이기 위하여 사용.
if (transform.position == Navi.destination) return;
위 그림에서 바닥, 그리고 두 개의 큐브가 있고 이들을 Bake 한 네비게이션 메시들을 볼 수 있다.Off Mesh Link 는 위처럼 떨어져 있는 네비게이션 메시들끼리 연결해주는 개념으로, 두 가지 빙식이 있다.
먼저 첫 번째 방식을 알아보자. 첫 번째 방식은 Bake 시점에 네비게이션 메시들끼리의 높낮이 차이, 떨어진 거리의 차이로부터 연결을 생성하는 방식이다. 높낮이의 경우, 두 네비게이션 메시끼리의 높낮이 차이가 특정 값 이하인 경우 높은 네비게이션 메시에서 낮은 네비게이션 메시로 연결이 생성된다. 이를 직접 눈으로 확인해보자. 왼쪽 큐브를 선택한 후 Navigation Window 에서 다음처럼 설정해준다.
Drop Height 의 경우 상황에 맞게 적당한 값을 넣어준다. 이 상태로 Bake 를 하면 다음과 같은 연결이 생성됨을 확인할 수 있다.
이러한 연결이 생기면 해당 큐브 위의 물체가 바닥의 특정 목표점으로 이동할 수 있는 경로가 만들어진 것이다.
거리의 차이로부터 연결을 생성하는 것은 높낮이 차이의 그것과 크게 다르지 않다. 단지 Drop Height 대신 Jump Distance 가 사용된다는 차이가 있다. 위 상태에서 Jump Distance 에도 적당한 값을 넣어서 Bake 해보면 다음과 같은 결과를 얻을 수 있다.
이번엔 옆 큐브 쪽의 네비게이션 메시로 연결이 생성됐다.
이제 두 번째 방식을 알아보자. 두 번째 방식은 연결되길 원하는 두 지점을 직접 지정하는 방식으로, 컴포넌트를 이용하기 때문에 Bake 할 필요가 없다. 먼저 두 개의 게임 오브젝트를 만들고 연결되길 원하는 각 지점에 배치한다. 이제 또 다른 게임 오브젝트에 Off Mesh Link 컴포넌트를 추가하고 Start, End 에 방금의 오브젝트들을 연결해준다.
두 지점이 네비게이션 메시와 어느 정도 근접해 있어야 연결이 생성된다. 에디터 상에서 두 지점을 이리저리 움직여가며 연결을 만들어보자.
Although it is possible to simultaneously use Baked GI lighting and Precomputed Realtime GI, be wary that the performance cost of rendering both systems simultaneously is exactly the sum of them both. Not only do we have to store both sets of lightmaps in video memory, but we also pay the processing cost of decoding both in shaders.
The cases in which you may wish to choose one lighting method over another depend on the nature of your project and the performance capabilities of your intended hardware. For example, on mobile where video memory and processing power is more limited, it is likely that a Baked GI lighting approach would be more performant. On ‘standalone computers’ with dedicated graphics hardware, or recent games consoles, it is quite possible to use Precomputed Realtime GI or even to use both systems simultaneously.
The decision on which approach to take will have to be evaluated based on the nature of your particular project and desired target platform. Remember that when targeting a range of different hardware, that often it is the least performant which will determine which approach is needed.
Enabling Baked GI or Precomputed Realtime GI
By default, both Precomputed Realtime GI and Baked GI are enabled in Unity’s Lighting panel (Lighting>Scene). With both enabled, which technique is used can then be controlled by each light individually (Inspector>Light>Baking).
Using both Baked GI and Precomputed Realtime GI together in your scene can be detrimental to performance. A good practise is to ensure that only one system is used at a time, by disabling the other globally. This can be done by unchecking the box next to either Precomputed Realtime GI or Baked GI from Unity’s lighting panel (Lighting>Scene). Now only the checked option will be present in your scene, and any settings configured per-light will be overridden.
Per-Light Settings
The default baking mode for each light is ‘Realtime’. This means that the selected light(s) will still contribute direct light to your scene, with indirect light handled by Unity’s Precomputed Realtime GI system.
However, if the baking mode is set to ‘Baked’ then that light will contribute lighting solely to Unity’s Baked GI system. Both direct and indirect light from those lights selected will be ‘baked’ into lightmaps and cannot be changed during gameplay.
Point light with the per-light Baking mode set to ‘Realtime’.
Selecting the ‘Mixed’ baking mode, GameObjects marked as static will still include this light in their Baked GI lightmaps. However, unlike lights marked as ‘Baked’, Mixed lights will still contribute realtime, direct light to non-static GameObjects within your scene. This can be useful in cases where you are using lightmaps in your static environment, but you still want a character to use these same lights to cast realtime shadows onto lightmapped geometry.
Baked lighting
Baked Lights are Light components which have their Mode property set to Baked.
Use Baked mode for Lights used for local ambience, rather than fully featured Lights. Unity pre-calculates the illumination from these Lights before run time, and does not include them in any run-time lighting calculations. This means that there is no run-time overhead for baked Lights.
Unity bakes direct and indirect lighting from baked Lights into light maps (to illuminate static GameObjects) and Light Probes (to illuminate dynamic Light GameObjects). Baked Lights cannot emit specular lighting, even on dynamic GameObjects (see Wikipedia: Specular highlight for more information). Baked Lights do not change in response to actions taken by the player, or events which take place in the Scene. They are mainly useful for increasing brightness in dark areas without needing to adjust all of the lighting within a Scene.
Baked Lights are also the only Light type for which dynamic GameObjects cannot cast shadows on other dynamic GameObjects.
Advantages of baked lighting
High-quality shadows from statics GameObjects on statics GameObjects in the light map at no additional cost.
Offers indirect lighting.
All lighting for static GameObjects can be just one Texture fetched from the light map in the Shader.
Disadvantages of baked lighting
No real-time direct lighting (that is, no specular lighting effects).
No shadows from dynamic GameObjects on static GameObjects.
You only get low-resolution shadows from static GameObjects on dynamic GameObjects using Light Probes.
Increased memory requirements compared to real-time lighting for the light map texture set, because light maps need to be more detailed to contain direct lighting information.
Technical details
For baked Lights, Unity precomputes the entire light path, except for the path segment from the Camera to the Surface. See documentation on Light Modes for more information about light paths.
on a scene that has been lightmapping lovely in 5.4 when I updated to 5.6 and tried to use the preview setup, in the console window I got this error message (about 500 times before I stopped it..)
[PathTracer] AddInstanceProperties job with hash: ce62aefc8a3f22e61195f7c7bfa3e55a failed with exit code 5.
[PathTracer] UpdateInstanceTransforms job with hash: 333deab6c8a92acff9f081bd396fa3e5 failed with exit code 1.
Tried deleting lightmap cache, tried clearing baked data, opened and closed Unity several times, restarted my computer, but error persists.
I have 16GB memory and when using the progressive lightmapper, memory usage on my PC goes from 2GB to 15.9GB and then Unity crashes, so it must to be a memory issue, like you say.
오클루전 컬링은 다른 오브젝트에 가려져 카메라에 비치지 않게 되어 버린 오브젝트의 렌더링을 무효화하는 기능입니다.
오클루전 컬링
오클루전 컬링은 다른 오브젝트에 가려져 카메라에 비치지 않게 되어 버린 오브젝트의 렌더링을 무효화하는 기능입니다. 3D 컴퓨터 그래픽의 세계에서는 대부분의 경우 카메라에서 먼 오브젝트에서 먼저 그려지며, 더 가까이 있는 오브젝트가 차례차례 덮어써지게 됩니다(“오버 드로우”라고 부릅니다). 오클루전 컬링은 그만큼 당연한 기능이 아닙니다. 오클루전 컬링은 절두체 컬링(Frustum Culling)과는 다릅니다. 절두체 컬링은 카메라의 표시 영역에서 벗어난 오브젝트의 렌더링을 비활성화하는 것이고, 오클루전 컬링과 같이 오버 드로우에 의해 안 보이게 되는 오브젝트 렌더링은 무효화하지 않습니다. 또한, 오클루전 컬링을 사용하면서 동시에 절두체 컬링의 혜택을 누릴 수 있습니다.
A maze-like indoor level. This normal scene view shows all visible Game Objects.Regular frustum culling only renders objects within the camera’s view. This is automatic and always happens.Occlusion culling removes additional objects from within the camera rendering work if they are entirely obscured by nearer objects.
오클루전 컬링 처리에서는 먼저 가상 카메라를 사용하여 가시 상태가 될 수 있는 오브젝트의 계층 구조가 생성됩니다. 게임 실행시에는 각 카메라가 이 데이터를 이용하여 가시 여부를 확인합니다. 그 확인 결과를 이용하여 Unity는 가시 상태의 오브젝트만을 렌더링합니다. 그 결과, 드로우콜 수가 감소하고 게임 성능이 향상됩니다.
오클루전 컬링에 사용되는 데이터는 셀(Cell)로 구성되어 있습니다. 각 셀은 씬 전체의 바운딩 볼륨(Bounding Volume)을 분할한 것입니다. 그리고 보다 상세하게는,이 셀은 이진 트리(Binary tree)를 구성하고 있습니다. 오클루전 컬링은 두개의 트리 구조 데이터를 사용합니다. 하나는 View Cells(정적 오브젝트용)이고 다른 하나는 Target Cells(동적 오브젝트용)입니다. View Cells는 가시의 정적 오브젝트용의 인덱스에 연결되어 있어, 정적 오브젝트에 대한 더 정확한 컬링 결과를 제공하기 위해 사용됩니다.
게임 오브젝트를 만들 때는 이 셀을 명심해두면 좋을 것입니다. 왜냐하면 게임 오브젝트와 셀의 크기의 좋은 밸런스를 위해 필요하기 때문입니다. 가능한한, 오브젝트에 대해 너무 작은 셀이나, 여러 셀을 포함하는 오브젝트를 만들어서는 안 됩니다. 큰 개체를 작은 조각으로 분할하여 컬링의 효과를 향상시킬 수 있습니다. 그러나 다른 한편으로는 드로우콜을 줄이기 위해 작은 오브젝트를 병합할 수 있습니다. 그리고 동일한 셀에 포함된 오브젝트끼리는 오클루전 컬링의 효과는 발동하지 않는다는 점도 주의가 필요합니다. 어떤 셀이 어느 셀에서 보고 표시 상태가 되는지에 대한 판정에 사용되는 셀 표시 정보를, 통틀어서 PVS (PotentiallyVisibleSet)이라고 합니다.
You can use the ‘overdraw’ scene rendering mode to see the amount of overdraw that is occuring, and the stats information pane in the game view to see the amount of triangles, verts, and batches that are being rendered. Below is a comparison of these before and after applying occlusion culling.
Notice in the Overdraw scene view, a high density of overdraw as many rooms beyond the visible walls are rendered. These aren’t visible in the game view, but nonetheless time is being taken to render them.With occlusion culling applied, the distant rooms are not rendered, the overdraw is much less dense, and the number of triangles and batches being rendered has dropped dramatically, without any change to how the game view looks.
오클루전 컬링 설정
오클루전 컬링을 이용함에 있어 몇 가지 수작업이 필요합니다. 먼저 레벨의 지오메트리를 적당한 크기의 조각으로 분할해야 합니다. 한층 더 레벨이 명확하게 정의된, 가능한 한 작은 영역마다 정리되는 대로 배치하는 것도 좋습니다. 또한, 벽, 빌딩 등의 거대한 오브젝트들로부터 가려진 영역을 소규모로 정의된 영역에 레벨을 배치하는게 도움이 됩니다. 이 개념은 개별 메쉬가 오클루전의 데이터를 기반으로 활성화 또는 비활성화된다는 것입니다. 따라서 예를 들면, 당신의 레벨에 단 하나의 오브젝트 밖에 없고, 게다가 그 안에 방과 모든 가구의 메쉬가 포함된 경우에는 모두가 컬링되거나 또는 아무것도 컬링되지 않거나의 두 개의 선택이 되어 버립니다. 이래서는 의미가 없습니다. 또한 가구의 파트마다 메쉬를 나누어 각 부분이 카메라의 관점에 기초하여 컬링되도록 하는 것도 마찬가지로 의미가 없습니다.
씬 안에서 오클루전을 적용하는 모든 오브젝트는 Inspector에서 Occluder Static 태그를 붙일 필요가 있습니다. 이렇게 하는 빠른 방법은, 오클루전의 계산에 포함할 오브젝트를 다중 선택하고 Occluder Static 및 Occludee Static 체크 마크를 붙이는 것입니다.
오브젝트의 오클루전에 대해 마킹
Occludee Static 을 어떤 경우에 사용할 수 있는지 설명합니다. 다른 오브젝트를 가로막는 것이 없는 투명한 오브젝트와 작은 오브젝트는 Occluders 대신 Occludees의 확인란을 선택해야 합니다. 체크된 오브젝트는 다른 오브젝트에 의한 가림 판정시에 고려되어, 가려진 측면으로 판정시에는 무시됩니다. 이에 따라 계산 비용이 낮아집니다.
오클루전 컬링 창
대부분의 오클루전 컬링 처리에 대해서는, Occlusion Culling 창 (Window->Occlusion Culling) 을 사용 해야 합니다.
Occulusion Culling 창에서는 가리는 쪽이 될 메쉬의 설정이나, Occlusion Areas 설정이 가능합니다.
Occlusion Culling window의 Object 탭을 표시 중이고 씬에서 [Mesh Renderer](class- MeshRenderer)를 선택하는 경우, 그것에 Static 관련 플래그를 변경할 수 있습니다.
메쉬 렌더러 용 Occlusion Culling 창
Occlusion Culling window의 Object 탭을 표시 중이고 Occlusion Area를 선택하는 경우에는 오클루전 영역 관련 프로퍼티를 변경할 수 있습니다 (자세한 내용은 Occlusion Area를 참조하십시오).
오클루전 영역의 Occlusion Culling 창
참고: 오클루전 영역을 하나도 만들지 않으면 기본값으로 씬 전체에 오클루전 컬링이 적용됩니다.
참고: 카메라가 오클루전 영역 외에 있는 경우, 오클루전 컬링은 적용되지 않습니다. 따라서 카메라가 이동할 수 있는 위치를 모두 커버하도록 오클루전 영역을 설정하는 것이 중요합니다. 그러나 오클루전 영역이 너무 크면 이번에는 베이크 처리에 시간이 걸리게 되어 버립니다.
오클루전 컬링 - Bake
오클루전 컬링 인스펙터의 Bake 탭
The occlusion culling bake window has a “Set Default Parameters” button, which allows you to reset the bake values to Unity’s default values. These are good for many typical scenes, however you’ll often be able to get better results by adjusting the values to suit the particular contents of your scene.
프로퍼티
프로퍼티
기능
Smallest Occluder
The size of the smallest object that will be used to hide other objects when doing occlusion culling. Any objects smaller than this size will never cause objects occluded by them to be culled. For example, with a value of 5, all objects that are higher or wider than 5 meters will cause hidden objects behind them to be culled (not rendered, saving render time). Picking a good value for this property is a balance between occlusion accuracy and storage size for the occlusion data.
Smallest Hole
This value represents the smallest gap between geometry through which the camera is supposed to see. The value represents the diameter of an object that could fit through the hole. If your scene has very small cracks through which the camera should be able to see, the Smallest Hole value must be smaller than the narrowest dimension of the gap.
Backface Threshold
Unity’s occlusion uses a data size optimization which reduces unnecessary details by testing backfaces. The default value of 100 is robust and never removes backfaces from the dataset. A value of 5 would aggressively reduce the data based on locations with visible backfaces. The idea is that typically, valid camera positions would not normally see many backfaces - for example, the view of the underside of a terrain, or the view from within a solid object that you should not be able to reach. With a threshold lower than 100, Unity will remove these areas from the dataset entirely, thereby reducing the data size for the occlusion.
bake 탭의 하단에는 Clear와 Bake 버튼이 있습니다. 오클루전 컬링 데이터를 생성하기 위해서 Bake 버튼을 클릭합니다. 한번 데이터가 생성되고나면, Visualization 탭을 이용하여 오클루전 컬링을 테스트할 수 있습니다. 만약 결과가 만족스럽지 않은 경우, Clear 버튼을 클릭하면 이전의 계산 결과를 지우고, 셋팅을 조절하고, 다시 구울(bake) 수 있습니다.
오클루전 컬링 - Visualization
오클루전 컬링 인스펙터의 Visualization 탭
바운딩 볼륨의 크기는 씬 내의 모든 오브젝트에 영향을 받기 때문에 가능한 모든 오브젝트가 씬의 가시 영역에 맞도록 하십시오.
오클루전 데이터를 생성할 준비가 끝나면 Bake 버튼을 클릭하십시오. 그 때, Bake 탭에 있는 Memory Limit 값을 올바르게 선택합시다. 이 값이 작을수록 데이터의 생성 속도가 빨라지며, 내용은 정확하지 않게 됩니다. 반대로 값이 클수록 릴리즈를 위한 제품 레벨의 퀄리티에 다가갑니다.
오클루전 데이터의 생성에 걸리는 시간은 셀의 정보와 데이터 크기, 선택한 퀄리티에 좌우된다는 점에 유의하십시오. Unity는 메인 윈도우 하단에 PVS 생성의 상태를 표시합니다.
생성 처리가 완료되면 뷰 영역에 다채로운 색상의 큐브들이 표시됩니다. 이같은 색으로 표시된 영역은 같은 오클루전 데이터를 공유하고 있습니다.
Clear 버튼을 클릭하면 오클루전 컬링을 위해 미리 계산된 데이터를 지울 수 있습니다.
오클루전 영역
오클루전 컬링을 적용하기 위해서는 Occlusion Area를 만들고 이동하는 오브젝트가 배치될 위치가 되도록 크기를 수정해야 합니다(당연히, 이동하는 오브젝트를 Static으로 할 수는 없습니다). Occlusion Area를 만들려면, 빈 게임 오브젝트에Occlusion Area 컴포넌트를 추가합니다. (메뉴에서 Component -> Rendering -> Occlusion Area)
Occlusion Area를 만든 후, IsTargetVolume 확인란을 선택하여 움직이는 오브젝트를 오클루전(무시)합니다.
프로퍼티:
기능:
Size
오클루전 영역의 크기를 정의
Center
오클루전 영역의 중심을 설정합니다. 기본적으로 (0,0,0)이고, 박스의 중앙에 위치하고 있습니다.
Is View Volume
카메라를 배치할 위치를 정의합니다. Occlusion Area 에 있는 Static 오브젝트를 오클루전할 때 활성화 합니다.
움직이는 오브젝트에 대한 오클루전 영역 프로퍼티.
Occlusion Area를 만든 후 상자를 셀 분할하는 방법을 확인해야 합니다. Occlusion Area가 어떻게 산출되었는지 확인하기 위해서는 Occlusion Culling Preview Panel 에서 Edit를 선택하고 View 를 토글하여 선택하십시오 .
생성된 오클루전 테스트
오클루전을 설치한 후, Occlusion Culling 을 선택하고 (Visualize mode의 Occlusion Culling Preview Panel에서) Main Camera를 씬 뷰 안으로 이동함으로써 테스트할 수 있습니다.
씬 뷰의 오클루전 뷰 모드
메인 카메라를 이동하는데 맞추어 (Play 모드가 아닌 경우에도) 오브젝트가 비활성화(disable)가 되는 것을 확인할 수 있습니다. 오클루전 데이터에 오류가 나오지 않는 것을 확인할 필요가 있습니다. 이동함에 따라 오브젝트가 뷰에 끼어 들어 오면 오류로 인식할 수 있습니다. 이 경우 오류를 해결하기 위해 옵션으로는 화면 해상도를 변경(Target Volumes를 변경한 경우)하거나, 오브젝트를 이동하여 오류가 나오지 않게 하는 방법이 있습니다. 오클루전에서 디버깅을 하기 위해서는 메인 카메라를 문제가 있는 위치로 이동하여 집중 검사를 할 수 있습니다.
처리가 완료되면 뷰 영역에서 컬러풀한 큐브를 확인할 수 있습니다. 파란 큐브는 Target Volumes(Target Volume)의 셀 분할을 의미합니다. 흰색 큐브는View Volumes(View Volume)의 셀 분할을 의미합니다. 만약 파라미터가 올바르게 설정되어 있으면 일부 오브젝트는 렌더링되지 않습니다. 그 이유는 카메라의 뷰 프러스텀의 외부에 있거나 다른 오브젝트의 배치에 의해 무시되었을 것입니다.
오클루전이 완료된 후, 씬에서 아무것도 오클루전되지 않은 경우, 오브젝트를 더 작은 부분으로 분해하여 그 오브젝트가 셀 안에 들어가는 크기로 되어 집니다.
다운로드 한 데이터에서 만든 에셋 번들에서 오브젝트가 있으면 세 가지 방법으로 오브젝트를 로드할 수 있습니다 :
[AssetBundle.LoadAsset](ScriptRef : AssetBundle.LoadAsset.html)에서 이름 식별자를 파라미터로 사용하여 오브젝트를 로드합니다. 이름은 프로젝트 뷰에 표시되는 것입니다. 선택적으로 오브젝트 타입을 파라미터로 Load 메소드에 전달하여 로드된 오브젝트가 특정 타입인지 여부를 확인할 수 있습니다.
[AssetBundle.LoadAssetAsync](ScriptRef : AssetBundle.LoadAssetAsync.html)는 위의 Load 메소드처럼 작동하지만, 에셋이 로드될 때 메인 스레드를 차단하지 않습니다. 따라서 이 메소드는 큰 에셋이나 여러 에셋을 동시에 로드할 때 응용 프로그램이 정지하는 것을 피하는 데에 유용합니다.
[AssetBundle.LoadAllAssets](ScriptRef : AssetBundle.LoadAllAssets.html)에 의해 에셋 번들에 포함된 모든 오브젝트를 로드합니다. AssetBundle.LoadAsset과 마찬가지로 오브젝트를 타입에 따라 필터링 할 수 있습니다.
에셋을 언로드하려면 [AssetBundle.Unload](ScriptRef : AssetBundle.Unload.html)를 사용해야 합니다. 이 메소드는 boolean 인수로 Unity에서 모든 데이터를 언로드 할 지(로드된 에셋의 오브젝트를 포함), 다운로드 한 번들에서 압축된 데이터만 언로드 할 지 여부를 지정합니다. 만약 응용프로그램에서 에셋 번들의 어떤 오브젝트를 사용하고 있고, 메모리를 확보하려는 경우, False를 전달하여 메모리에서 압축된 데이터를 언로드 할 수 있습니다. 만약 에셋 번들에서 완전히 모두를 언로드하려면 True를 전달하여 에셋 번들에서 로드된 에셋을 삭제합니다.
에셋 번들로부터 오브젝트를 비동기 로드
[AssetBundle.LoadAssetAsync](ScriptRef : AssetBundle.LoadAssetAsync.html) 메소드를 사용하여 오브젝트를 비동기 로드함으로써 응용 프로그램에 끊기는 현상(hiccup)이 생길 가능성을 줄입니다.
using UnityEngine;

// Note: This example does not check for errors. Please look at the example in the DownloadingAssetBundles section for more information
IEnumerator Start () {
    while (!Caching.ready)
        yield return null;
    // Start a download of the given URL
    WWW www = WWW.LoadFromCacheOrDownload (url, 1);

    // Wait for download to complete
    yield return www;

    // Load and retrieve the AssetBundle
    AssetBundle bundle = www.assetBundle;

    // Load the object asynchronously
    AssetBundleRequest request = bundle.LoadAssetAsync ("myObject", typeof(GameObject));

    // Wait for completion
    yield return request;

    // Get the reference to the loaded object
    GameObject obj = request.asset as GameObject;

        // Unload the AssetBundles compressed contents to conserve memory
        bundle.Unload(false);

        // Frees the memory from the web stream
        www.Dispose();
}
인터넷에 아래처럼 에셋번들 빌드하는게 돌아 다니는데 이걸로 하면 최근 버전에선 사용되지 않는 옵션들로 변경되어 있다
How to get multiple files with different extension?
You can't set more search filters, because GetFiles only accepts a single search pattern. Instead, you can call GetFiles with no pattern, and filter the results in code, using Lambda expressions:
Well resources just in Assets aren't going to be in your build, they get packed up and all sorts, and then only if they are used. Assets in the Streaming Assets folder will be copied into the jar for your build.
The sub folders and pngs are in my streaming assets folder in unity. When it gets exported as a google android project, they are in the android project's assets folder.
Is there some (alternative) way to list up all .png files in my sub folder ?
Also keep in mind, like mentioned on the doc page, on android the files are not in a folder, they are within a jar file. So GetFiles won't work on this path since it's not an actual path. If you want to "browse" your folder you need a zip-library to open the jar manually.
GetFiles works perfectly well on real folders as long as you have file permission.
To solve this problem I created pre-compilation script which will run before the compilation; this script will list the names of the files you want to access later in text file
on some platforms it is not possible to directly access the StreamingAssets folder because there is no file system access in the web platforms, and because it is compressed into the .apk file on Android.
LevelInfo LI =(LevelInfo)formatter.Deserialize(MS);
SetLevel(LI);
}
So what do I do. I open my own written level editor on Unity, create some levels that gonna be custom afterwards, and save them to StreamingAssets (I serialize a class that consists of arrays and some small vars). Then I build the game and access those files whenever I need. Everything works fine on PC, but nothing happens on Android platform. I checked File.Exists(path), and it returned false (however I'm not sure if it works correctly on Android). Path is "jar:file:///mnt/asec/com.Vol4icaGames.WR-1/pkg.apk!/assets/TestLevel"
Some platforms like android do not give you direct access to the streaming assets directory. On android the streaming assets directory is compressed into the apk, and so is not available for you to just read/write files to normally.
It is advised that if you want to save/load files on mobile devices, you should be doing so to the persistantDataPath instead, as you should have no problem reading/writing files to this directory.
That's true. But persistantDataPath is for saving some data after the build and reading it afterwards. What I want to do is to save information about game levels themselves, not the player progress in them. This means that I have to have pre-written info files that I have to be able to read when I want to load level. Even if I manage to copy level files into persistantDataPath, somehow, it is located on SD-card (is it?) and if user has no such card (inserted or card slot at all) the game gonna break... That's what I don't want. I have no idea how to store level info in other way.. To create hundreds of similar scenes is not what I would want to do..
Ah sorry I missread part of the initial question. But now that I have more of an idea of what you are trying, is there any specific reason that these level files you're saving at edit time need to be in streaming assets? could they not be in resources instead? and then loaded via Resources.Load instead of manually reading the files yourself?
StreamingAssets is a folder that keeps files in it in the form they were created. Not compressed, not converted into some other format etc. So I can access any file by its name. Can I do same thing with Resources folder? I know how to do it with sprites etc, but have no idea what to do with byte file.
Contains the path to the StreamingAssets folder (Read Only).
If you have a "StreamingAssets" folder in the Assets folder of your project, it will be copied to your player builds and be present in the path given by Application.streamingAssetsPath.
Note that on some platforms it is not possible to directly access the StreamingAssets folder because there is no file system access in the web platforms, and because it is compressed into the .apk file on Android. On those platforms, a url will be returned, which can be used using the UnityWebRequest class.
using UnityEngine;
using System.Collections;

public class ExampleClass : MonoBehaviour {
    public string filePath = System.IO.Path.Combine(Application.streamingAssetsPath, "MyFile");
    public string result = "";
    IEnumerator Example() {
        if (filePath.Contains("://")) {
            Networking.UnityWebRequest www = Networking.UnityWebRequest.Get(filePath);
            yield return www.SendWebRequest();
            result = www.downloadHandler.text;
        } else
            result = System.IO.File.ReadAllText(filePath);
    }
}
스프라이트 객체를 AssetBundle로 만들고 난뒤 AssetBundle을 통해 스프라이트 객체로 로드를 했는데 로드를 하지 못하고 null을 리턴하는 현상이 발생했습니다. Unity 4.3 버젼에서는 스프라이트는 어셋번들로 만들면서 데이터가 떨어져 나가고 텍스쳐로 로드해서 스프라이트로 변환 해야 한다고하는 군요.
그래서 텍스쳐를 스프라이트로 변경하는 방법에 대해서 살짝 짚고 넘어가보도록 하겠습니다.
Rect rect = new Rect(0, 0, texture.width, texture.height);
sprite.GetComponent<SpriteRenderer>().sprite = Sprite.Create(texture, rect, new Vector2(0.5f, 0.5f));
추가 : Sprite Packer를 이용해 패킹한 sprite는 asset bundle을 통해서도 정상적으로 로드 되었다.
4장 ScriptableObject 4.1 ScriptableObject란 ScriptableObject란 독자적인 Asset을 작성하기 위한 구조입니다. 또한, 유니티의 Serialize 구조를 사용하는 형식이라고도 할 수 있음. 유니티에서는 독자적인 Serialize 구조를 갖고 있어, 모든 오브젝트(UnityEngine.Object)는, 그 Serialize 구조를 통해서 데이터의 Serialize / Deserialize를 실행해, 파일과 Unity 에디터간의 조합을 하고 있음. Serialize 구조에 대해서는 5장 SerializedObject에 대해서 를 참조. 유니티 내부의 Asset(Material과 애니메이션 클립 등)은 모두 UnityEngine.Object의 자식 클래스임. 독자적인 Asset을 만들기 위해서, UnityEngine.Object의 자식 클래스를 작성하고 싶은데, 유저 측에서는 UnityEngine.Object의 자식 클래스를 작성하는게 금지되어 있음. 유저가 Unity의 Serialize 구조를 이용한, 독자적인 Asset을 작성하기 위해서는 ScriptableObject를 사용할 필요가 있음. 4.2 ScriptableObject는 유니티 에디터의 요소 ScriptableObject는 유니티 에디터의 다양한 곳에서 사용되고 있음. 씬 뷰나 게임 뷰 등의 에디터 윈도우는, ScriptableObject의 자식 클래스에서 생성되었고, 또한 인스펙터에 GUI를 표시하는 Editor 오브젝트도 ScriptableObject의 자식 클래스에서 생성됨. 유니티 에디터는 ScriptableObject로 작성되어 있다고 해도 과언이 아님.
4.3 ScriptableObject를 작성 ScriptableObject를 작성하기 위해서는 먼저 ScriptableObject 클래스를 상속한 클래스를 작성해야함. 이때, 클래스 이름과 Asset이름은 통일시켜야함. MonoBehaviour와 같은 제한.
using UnityEngine;publicclassExampleAsset: ScriptableObject
{}
[인스턴스 화] ScriptableObject는 ScriptableObject.CreateInstance로 생성합니다. new를 사용해서 인스턴스 화해선 안됨. 이유는 MonoBehaviour와 마찬가지로, 유니티의 Serialize 구조를 경유해서 오브젝트를 만들 필요가 있으니까.
using UnityEngine;
using UnityEditor;publicclassExampleAsset: ScriptableObject
{[MenuItem ("Example/Create ExampleAsset Instance")]staticvoid CreateExampleAssetInstance (){var exampleAsset = CreateInstance<ExampleAsset>();}}
[Asset으로 저장] 다음은 인스턴스화시킨 오브젝트를 Asset으로 저장시킵니다. Asset의 작성은 AssetDatabase.CreateAsset을 사용해서 작성할 수 있음. Asset의 확장자는, 반드시, .asset이 아니면 안됨. 다른 확장자로 해버리면, 유니티는 ScriptableObejct를 상속한 Asset으로서 인식하지 못함.
[인스펙터에 프로퍼티를 표시] MonoBehaviour와 마찬가지로, 필드에 SerializeField를 붙이면 표시됨. 또한 PropertyDrawer도 적용시킴.
using UnityEngine;
using UnityEditor;publicclassExampleAsset: ScriptableObject
{[SerializeField]
string str;[SerializeField, Range (0,10)]
int number;[MenuItem ("Example/Create ExampleAsset Instance")]staticvoid CreateExampleAssetInstance (){var exampleAsset = CreateInstance<ExampleAsset>();
AssetDatabase.CreateAsset (exampleAsset,"Assets/Editor/ExampleAsset.asset");
AssetDatabase.Refresh ();}}
4.4 ScriptableObjecet의 부모 자식 관계 먼저, [부모인 ScriptableObject]와, 그 부모가 변수로서 가지는 [자식인 ScriptableObject]를 상상해주세요. 아래 코드는 그 이미지를 코드로 옮긴겁니다. <부모 ScriptableObject>
using UnityEngine;publicclassParentScriptableObject: ScriptableObject
{[SerializeField]
ChildScriptableObject child;}
<자식 ScriptableObject>
using UnityEngine;publicclassChildScriptableObject: ScriptableObject
{// 아무것도 없으면 인스펙터가 허전하므로 변수 추가[SerializeField]
string str;public ChildScriptableObject (){// 초기 Asset 이름을 설정
name ="New ChildScriptableObject";}}
다음으로, ParentScriptableObject를 Asset으로 해서 저장합니다. child도 인스턴스화시킨 상태로 해봤습니다. <자식 ScriptableObject>
using UnityEngine;
using UnityEditor;publicclassParentScriptableObject: ScriptableObject
{const string PATH ="Assets/Editor/New ParentScriptableObject.asset";[SerializeField]
ChildScriptableObject child;[MenuItem ("Assets/Create ScriptableObject")]staticvoid CreateScriptableObject (){// 부모를 인스턴스화var parent = ScriptableObject.CreateInstance<ParentScriptableObject>();// 자식을 인스턴스화
parent.child = ScriptableObject.CreateInstance<ChildScriptableObject>();// 부모를 Asset으로 저장
AssetDatabase.CreateAsset (parent, PATH);// Import 해서 최신 상태로 함
AssetDatabase.ImportAsset (PATH);}}
ParentScriptableObject를 Asset으로 저장한 후, 인스펙터를 보면, child 프로퍼티가 Type mismatch로 되어 있음.
시험삼아, Type mismatch 부분을 더블클릭하면, ChildScriptableObject의 정보가 인스펙터에 표시되어, 문제 없이 올바른 동작을 하는걸 볼 수 있음. [UnityEngine.Object를 Asset으로써 다루기 위해서는 디스크에 저장해야함] Type mismatch 상태의 child를 가진 ParentScriptableObject를 만들었으면, 그대로 유니티를 다시 실행해보세요. 또다시 ParentScriptableObject의 인스펙터를 보면 child 부분이 None(null)로 되어 있음.
이유는 ScriptableObject의 루트 클래스인 UnityEngine.Objec를 Serialize 데이터로써 다루기 위해서는, 디스크 상에 저장해야 하기 때문입니다. Type mismatch 상태는, 인스턴스가 존재하지만, 디스크 상에 Asset으로써 존재하지 않는 상태를 가리킵니다. 즉, 그 인스턴스가 어떤 상황(유니티 재시작 등)에서 파괴되어버리면 데이터에 접근할 수 없게 됩니다. [ScriptableObject는 모두 Asset으로써 저장할것] Type mismatch 상태를 회피하는것은 간단합니다. ScriptableObject를 모두 Asset으로써 저장해, 그 참조를 Serialize 가능한 필드로 가지면 해결됩니다.
단, 이번과 같은 부모 자식 관계가 있는 상태에서, 각자 독립된 Asset을 작성해버리는것은 관리 면에서 보면 효율적이지 않습니다. 그 수가 늘어나거나, 리스트를 다루는 경우가 되면 그 만큼 Asset을 작성하는 것은 파일 관리가 매우 귀찮아집니다. 그래서 Sub Asset이라는 기능을 사용해 부모 자식 관계인 Asset을 하나로 뭉칠 수 있습니다. [Sub Asset] 부모인 메인 Asset에 Asset 정보를 추가하는 것으로 UnityEngine.Object가 Sub Asset이 됩니다. 이 Sub Asset의 예시로 가장 알기 쉬운게 Model Asset입니다. Model Asset의 안에는, 메쉬와 애니메이션 등의 Asset이 포함되어 있습니다. 이들은 보통, 독립된 Asset으로 존재해야 하지만, Sub Asset으로써 다뤄지면, 메쉬와 애니메이션 등의 Asset을 메인 Asset 정보에 포함해 디스크 상에 저장하는 일 없이 사용할 수 있습니다.
ScriptableObject도 Sub Asset의 기능을 사용하는 것으로, 디스크 상에 쓸데없는 Asset을 늘리지 않고 부모 자식 관계의 ScriptableObject를 만들 수 있음. [AssetDatabase.AddObjectToAsset] UnityEngine.Object를 Sub Asset으로써 등록하기 위해서는, 메인이 되는 Asset에 오브젝트를 추가합니다. <자식 ScriptableObject>
using UnityEngine;
using UnityEditor;publicclassParentScriptableObject: ScriptableObject
{const string PATH ="Assets/Editor/New ParentScriptableObject.asset";[SerializeField]
ChildScriptableObject child;[MenuItem ("Assets/Create ScriptableObject")]staticvoid CreateScriptableObject (){// 부모를 인스턴스화 var parent = ScriptableObject.CreateInstance<ParentScriptableObject>();// 자식을 인스턴스화
parent.child = ScriptableObject.CreateInstance<ChildScriptableObject>();// 부모에 자식 오브젝트를 추가
AssetDatabase.AddObjectToAsset (parent.child, PATH);// 부모를 Asset으로서 저장
AssetDatabase.CreateAsset (parent, PATH);// Import 해서 최신 상태를 유지
AssetDatabase.ImportAsset (PATH);}}
부모인 ParentScriptableObject가 둘 있는듯 보이는 점, 실질적인 데이터를 가지고 있는 것은 계층적으로는 Sub Asset의 ParentScriptableObject인 점 등 좀 특수한 계층구조로 되어 있습니다.
이 상태는, 유저가 (Sub Asset을 작성하는 것으로 인해) 특수한 Asset을 만들었다고 유니티가 판단해서, 메인 Asset을 아무것도 맡지 않은 Default Asset으로써 표시한 상태입니다. 메인 Asset으로써 다루고 싶은 Asset을 Sub Asset 쪽에 이동시키는 상황은 매우 안좋습니다. 이런 식으로 유저의 손으로 Sub Asset을 작성하는 것은 할 수 있지만, 이걸 Model같이 최대한 활용하는것은 안됩니다. [HideFlags.HideInHierarchy로 Sub Asset을 숨기기] Sub Asset 자체를 숨기는 것으로, 메인 Asset만이 존재하는듯이 외관을 만들 수 있습니다.
이와 같이, 계층 표시는 안되지만 2개의 Asset을 하나로 뭉쳐 관리할 수 있게 되었습니다.
이 Sub Asset을 숨기는 방법은, AnimatorController에서도 이루어지고 있습니다. 확인해봅시다.
[MenuItem ("Assets/Set to HideFlags.None")]staticvoid SetHideFlags (){// AnimatorController를 선택한 상태에서 메뉴를 실행var path = AssetDatabase.GetAssetPath (Selection.activeObject);// Sub Asset 포함해서 모두 얻기
foreach (var item in AssetDatabase.LoadAllAssetsAtPath(path)){// flag를 모두 None으로 하고 비표시 설정을 해제
item.hideFlags = HideFlags.None;}// 다시 Import해서 최신 상태로 유지
AssetDatabase.ImportAsset (path);}
위에 적은 코드를 실행하면, HideFlags가 해제되어, Sub Asset이 표시됩니다.
[메인 Asset에서 Sub Asset을 제거하기] Sub Asset의 제거 방법은 간단합니다. Object.DestroyImmediate를 사용하는 것으로 Sub Asset을 해제할 수 있습니다.
[MenuItem ("Assets/Remove ChildScriptableObject")]staticvoid Remove (){var parent = AssetDatabase.LoadAssetAtPath<ParentScriptableObject>(PATH);// Asset의 CarentScriptableObject 를 파괴
Object.DestroyImmediate (parent.child,true);// 파괴하면 Missing 상태가 되므로 null 을 대입
parent.child =null;// 다시 Import해서 최신 상태를 갱신
AssetDatabase.ImportAsset (PATH);}
4.5 아이콘의 변경 기본 아이콘
딱히 중요한 부분은 아닌데 이 아이콘을 변경하는 방법을 알아봅시다. [스크립트에 아이콘을 설정] 스크립트 Asset을 선택해서 아이콘 부분을 선택하면, 아이콘 변경 패널이 뜨고, 거기에 Other 버튼을 클릭하면 변경하고싶은 아이콘으로 변경 가능.
[Gismos에 아이콘을 설정] 한가지 아이콘을 변경하는 방법으로써는, Gizmos 폴더에 [클래스 명] Icon이라고 이름지어서 이미지를 넣으면 변경됨. Gizmos 폴더가 Assets 폴더 아래에 있어야 하는 형태로 쓰기 힘들지도 모르겠는데, 같은 아이콘 이미지가 3개 늘어놔져 있어도 괜찮다는 점에서, 이 방법도 기억해두면 편리.
특별한 경우가 아니면 사용하지 않습니다. 유니티가 사용자의 스크립트를 직렬화 하는 경우에, public 필드만 직렬화합니다. 추가로 유니티가 private 필드를 직렬화하도록 설정하고 싶은 경우에, SerializeField 속성(attribute)을 필드에 추가할 수 있습니다.
직렬화를 하게되면 인스펙터에서 해당 필드가 노출됩니다. 유니티는 사용자의 모든 스크립트 컴포넌트를 직렬화 하고, 스크립트 컴포넌트를 직렬화된 버젼으로 다시 로드하고 재생성합니다. .NET의 serialization 기능과는 아무런 영향을 주지 않고, 유니티 내부에서만 동작합니다.
사용되는 직렬화 시스템은 다음을 수행 할 수 있습니다:
- CAN serialize public nonstatic fields (of serializable types) - CAN serialize nonpublic nonstatic fields marked with the [SerializeField] attribute. - CANNOT serialize static fields. - CANNOT serialize properties.
유니티에서 직렬화할 수 있는 타입인 경우에만 사용자의 필드가 직렬화 될 수 있습니다:
직렬화될 수 있는(Serializable) 타입은 다음과 같습니다:
- All classes inheriting from UnityEngine.Object, for example GameObject, Component, MonoBehaviour, Texture2D, AnimationClip. - All basic data types like int, string, float, bool. - Some built-in types like Vector2, Vector3, Vector4, Quaternion, Matrix4x4, Color, Rect, LayerMask. - Arrays of a serializable type - List of a serializable type) - Enums - Structs
요점 정리: List(또는 Array)에 같은 element를 넣은 경우, List가 직렬화 될 때, 새 list를 두번 복사하는 대신 element의 두 사본을 얻게됩니다.
Awake 함수에서 직렬화하지 않는 Dictionary에 연결해서 활용할 수 있습니다. 이 방법은 Dictionary를 수정하고 다시 저장 하고 싶은 경우의 해결방법은 아니지만, 다른 많은 클래스에서 편리한 기능이 될 수 있습니다. 유니티 스크립트 사용자들을 위해: c#의 필드는 UnityScript안의 스크립트 변수이고, [SerializeField]는 @SerializeField가 됩니다. 클래스 상의 [Serializable]는 UnityScript에서 @script Serializable이 됩니다.
For UnityScript users: Fields in c# is a script variable in UnityScript, and [SerializeField] becomes @SerializeField. [Serializable] on a class becomes @script Serializable in a UnityScript.
FormerlySerializedAs 의 경우 너무 많이 스게 되면 코드가 복잡해 질 수 수있다
[Unity] 데이터 손실 없이 SerializedField 이름 바꾸기
유니티로 작업하다 보면 데이터를 저장하기 위해 SerializedField와 같은 어트리뷰트를 사용한다. 문제는 개발 도중 이 필드의 이름이 변경되어 기존 저장된 데이터들을 사용하지 못하게 되는 경우가 있다. 이런 경우 FormerlySerializedAs 어트리뷰트를 이용해 기존 버전과의 호환성을 유지해 줄 수 있다.
만일 아래와 같이 m_MyVariable이라는 멤버 변수를 사용하고 있는데 :
class MyClass : MonoBehaviour
{
[SerializeField]
private string m_MyVariable;
}
m_MyVariable의 이름이 다른 것으로, 예를 들자면 m_ABetterName와 같이 바뀐다면 기존에 m_MyVariable의 이름으로 저장된 데이터를 읽어 들이지 못하게 된다.
이럴 경우 아래와 같이 작성해주게 된다면 기존 m_MyVariable의 데이터를 m_ABetterName으로 치환해서 읽어 들일수 있다 :
class MyClass : MonoBehaviour
{
[FormerlySerializedAs("m_MyVariable")]
[SerializeField]
private string m_ABetterName;
}
그리고 FormerlySerializedAs 는 여러번 중복해서 사용가능하다. 만일 이름이 여러 번 변경 된다고 하더라도 변경 히스토리에 따라 FormerlySerializedAs 어트리뷰트를 유지해 준다면 여전히 데이터 손실 없이 사용이 가능하다.
RequireComponent를 사용하는 스크립트를 추가하면, 요구되는 컴포너트가 자동으로 해당 게임오브젝트에 추가됩니다. 설정 오류를 피하는 데 유용합니다. 예를 들어, 리지드 바디가 요구되는 스크립트가, 항상 같은 게임오브젝트에 첨부되는 경우. RequireComponent를 사용하면 이 작업이 자동으로 이루어 지기 때문에, 설정에 대한 실수를 할 염려가 없습니다.
Note that RequireComponent only checks for missing dependencies during the moment the component is added to a GameObject. Existing instances of the component whose GameObject lacks the new dependencies will not have those dependencies automatically added.
[SphereCast ] : 광선을 따라 구를 캐스팅하고 무엇이 맞았는지에 대한 자세한 정보를 반환합니다.
Raycast가 충분한 정밀도를 제공하지 않을 때 유용합니다. 왜냐하면 캐릭터와 같은 특정 크기의 객체가 도중에 충돌하지 않고 어딘가로 이동할 수 있는지 알아 내려고하기 때문입니다. 두꺼운 레이 캐스트와 같은 캐스트를 생각해보십시오. 이 경우 광선은 시작 벡터와 방향으로 지정됩니다.
public static bool SphereCast(Vector3origin, float radius, Vector3direction, out RaycastHithitInfo, float maxDistance = Mathf.Infinity, int layerMask = DefaultRaycastLayers, QueryTriggerInteractionqueryTriggerInteraction = QueryTriggerInteraction.UseGlobal);
Parameters
origin
The center of the sphere at the start of the sweep.
radius
The radius of the sphere.
direction
The direction into which to sweep the sphere.
hitInfo
If true is returned, hitInfo will contain more information about where the collider was hit. (See Also: RaycastHit).
maxDistance
The max length of the cast.
layerMask
A Layer mask that is used to selectively ignore colliders when casting a capsule.
queryTriggerInteraction
Specifies whether this query should hit Triggers.
설명
구체를 씬 상의 모든 충돌체를 대상으로 발사하여 충돌한 것에 대한 자세한 정보를 반환합니다.
Raycast가 충분한 정밀도를 제공하지 않아 캐릭터와 같이 이동하는 길에 아무것도 충돌하지 않는 물체의 특정 크기를 알아내야 할때 이 함수가 유용할 수 있습니다. Sphere cast를 두꺼운 raycast라고 생각하십시오.
선 대신 구를 던져서 캐스팅
"스윕" 설명
( 스윕 교차) : 어떤 물체를 치고 지나갈때 멈추게함을 말함 (https://www.unrealengine.com/ko/blog/moving-physical-objects)
[OverlapSphere]
지정한 위치로 부터 지정한 범위안에 접촉한 콜라이더 배열로 반환 (접촉 또는 범위안의 것들)
public static Collider[] OverlapSphere(Vector3 position, float radius, int layerMask = AllLayers, QueryTriggerInteraction queryTriggerInteraction = QueryTriggerInteraction.UseGlobal);
layerMask는 레이 캐스팅 시에 콜라이더를 선택적으로 무시하는데 사용
[사용]
using UnityEngine;
using System.Collections;

public class ExampleClass : MonoBehaviour
{
    void ExplosionDamage(Vector3 center, float radius)
    {
        Collider[] hitColliders = Physics.OverlapSphere(center, radius);
        int i = 0;
        while (i < hitColliders.Length)
        {
            hitColliders[i].SendMessage("AddDamage");
            i++;
        }
    }
}
강체(Rigidbody) 의 연속 충돌 감지(Continuous Collision Detection)와 충돌 감지 옵션들
Rigidbody 의 충돌 감지 옵션(Collision Detection) 설정
불연속(Discrete)일정 tick 간격으로 충돌 확인, 다른 콜라이더들은 충돌할때 불연속 충돌 감지를 사용한다. 일반 충돌들에 대해 사용되어진다, 이건 default 값임
시간 간격이 크거나 엄청 빨리 움직일때 충돌이 안될 수 있음, 성능이 크게 떨어지거나 할때 발생 할 수 있음, 하지만 연산은 빠름
연속(Continuous)보간으로 충돌 확인, 리지드 바디가 있는 동적 콜라이더에는 불연속 충돌을, 리지드 바디가 없는 정적 메쉬 콜라이더에는 연속 충돌을 적 연속 동적을 적용한 리지드 바디에 대한 충돌은 Continuous 한 충돌 감지를 한다, 즉 연속 동적을 적용한 오브젝트의 충돌 상대로서 사용함 물링 연산 성능에 크게 영향을 주기 때문에, 빠른 오브젝트의 충돌로문제가 나오지 않는 경우는 불연속을 사용하는 것이 좋다
동적연속(Continuous Dynamic)Continuous 및 Continuous Dynamic 충돌을 적용한 오브젝트에 대해 Continuous 충돌 감지를 수행한다 리지드 바디가 없는 정벅 메쉬 콜라이더에도 Continuous충돌을적용한다 다른 콜라이더에 대해서는 불연속 충돌 감지를 합니다, 고속으로 움직이는 오브젝트에 사용한다
연속 충돌 감지(Continuous Collision Detection)
연속 충돌 감지는 빠르게 움직이는 콜라이더가 서로 통과하지 않도록 하는 기능입니다. 이것은 일반 (Discrete) 충돌 감지 사용시, 오브젝트가 한 프레임에서 콜라이더의 한 쪽에 있고 다음 프레임에서 이미 콜라이더을 통과하는 경우에 발생할 수 있습니다. 이것을 해결하려면 빠르게 움직이는 오브젝트의 리지드 바디에서 연속 충돌 감지를 사용할 수 있습니다. 충돌 감지 모드를 Continuous로 전환하여, 리지드 바디가 정적 (즉, 리지드 바디가 없는) 메쉬 콜라이더를 통과하지 않도록 합니다. 충돌 감지 모드를 Continuous Dynamic로 전환하여, 리지드 바디가 충돌 탐지 모드를 Continuous 또는 Continuous Dynamic으로 설정하여 다른 지원되는 리지드 바디를 통과하지 않도록 합니다. 연속 충돌 감지는 Box, Sphere 및 Capsule의 콜라이더에서 지원됩니다. 연속 충돌 감지는 오브젝트에서 통과가 발생한 경우에 충돌을 잡기 위한 안전망이 목적이지만, 물리적으로 정확한 충돌 결과를 얻을 수 있는 것은 아니기 때문에 빠르게 움직이는 오브젝트에 문제가 있는 경우, TimeManger 인스펙터의 고정 Time step 변수를 줄여 시뮬레이션을 더 정밀하게 할 수 있습니다.
강체
Rigidbody를 통해GameObject가 물리적 제어하에 동작하게 됩니다. 리지드 바디는 힘과 토크를 받아 현실적으로 오브젝트를 움직일 수 있습니다. GameObject는 중력의 영향을 받는 리지드 바디를 포함하거나, 스크립팅을 통해 더해진 힘으로 작동하거나, NVIDIA PhysX 물리 엔진을 통해 그 외의 오브젝트와 상호 작용해야 합니다.
프로퍼티
프로퍼티:
기능:
Mass
The mass of the object (in kilograms by default).
Drag
힘에 의해 움직일 때, 오브젝트에 영향을 주는 공기 저항의 양. 0이면 공기 저항이 0이고, 무한대면 오브젝트는 즉시 움직임을 멈춥니다.
Angular Drag
토크에 의해 회전할 때 오브젝트에 영향을 주는 공기 저항의 양. 0이면 공기 저항 없음. 이 파라미터의 값을 무한대(infinity)로 설정하는 것만으로는 오브젝트의 회전을 즉시 중지할 수 없다는 점에 유의하십시오.
Use Gravity
활성화하면 오브젝트는 중력의 영향을 받습니다.
Is Kinematic
활성화하면 오브젝트는 물리 엔진에 의해 주도되지 않으며, Transform에 의해서만 조작될 수 있습니다. 이것은 플랫폼을 옮기려고 하는 경우나, HingeJoint를 추가한 리지드 바디를 애니메이션하려는 경우에 편리합니다.
Interpolate
Rigidbody의 움직임이 어색할 때 다음 옵션 중 하나를 시도하십시오.
- None
보간을 적용하지 않는다.
- Interpolate
이전 프레임의 Transform에 따라 Transform 스무딩.
- Extrapolate
다음 프레임의 Transform에 따라 Estimated Transform 스무딩.
###연속 충돌 감지(Continuous Collision Detection)
고속으로 움직이는 오브젝트가 충돌을 감지하지 않고 빠져나가는 것을 방지하기 위해 사용합니다.
- Discrete
Use Discreet collision detection against all other colliders in the scene. Other colliders will use Discreet collision detection when testing for collision against it. Used for normal collisions (This is the default value).
- Continuous
동적 콜라이더(리지드 바디 있음)에는 Discrete(불연속) 충돌, 정적 메쉬 콜라이더(리지드 바디 없음)에는 Continuous(연속) 충돌을 적용합니다. Continuous Dynamic을 적용한 리지드 바디에 대한 충돌은 Continuous한 충돌 감지를 합니다. 이것은 Continuous Dynamic을 적용한 오브젝트의 충돌 상대로서 사용합니다. (물리 연산 성능에 크게 영향을 주기 때문에, 빠른 오브젝트의 충돌로 문제가 나오지 않는 경우는 Discrete대로 하십시오.)
- Continuous Dynamic
Continuous 및 Continuous Dynamic 충돌을 적용한 오브젝트에 대해 Continuous 충돌 감지를 수행합니다. 정적 메쉬 콜라이더(리지드 바디 없음)에도 Continuous 충돌을 적용합니다. 다른 콜라이더에 대해서는 Discrete 충돌 감지를 합니다. 고속으로 움직이는 오브젝트에 사용합니다.

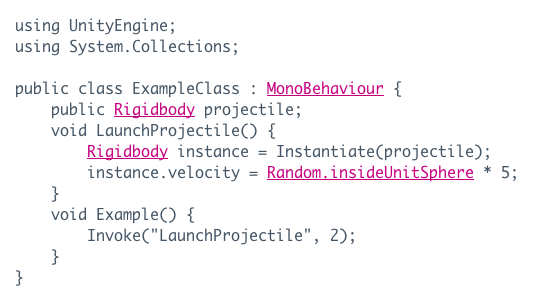
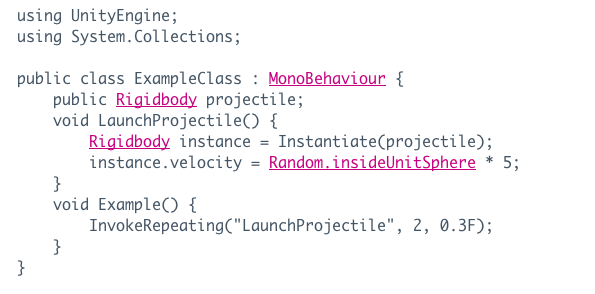
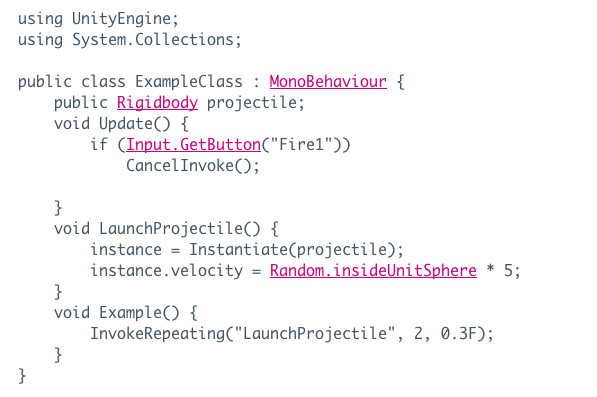
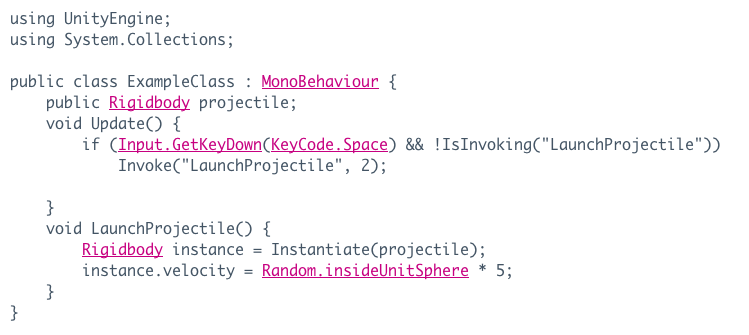


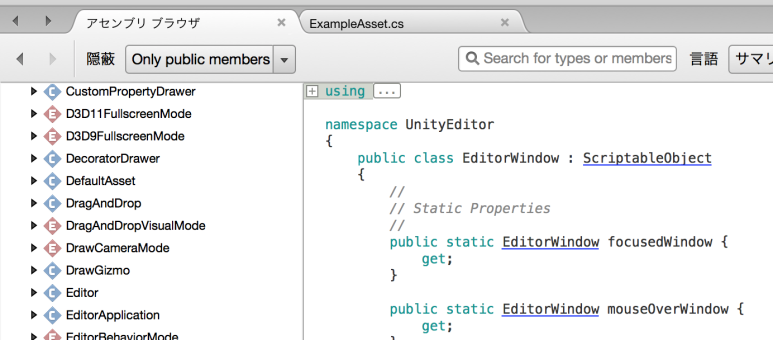

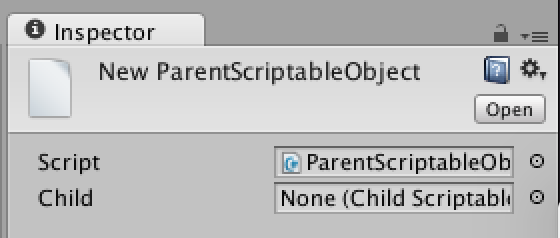
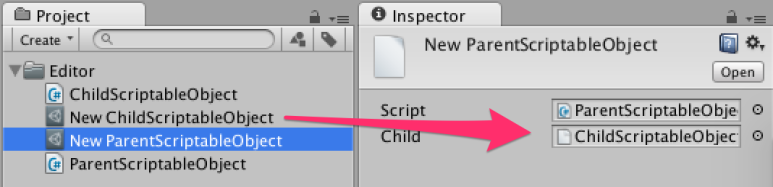
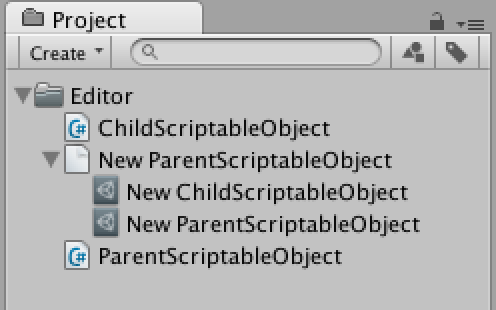

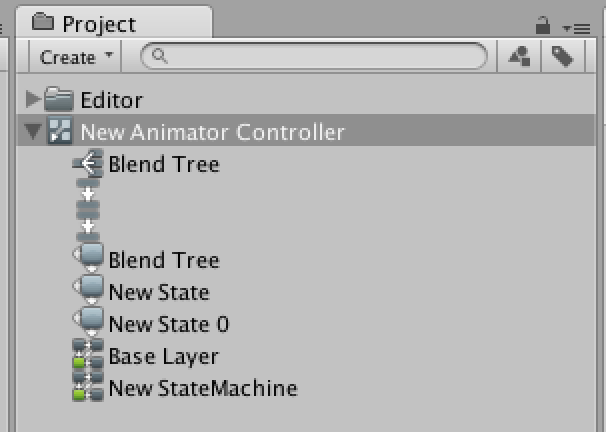

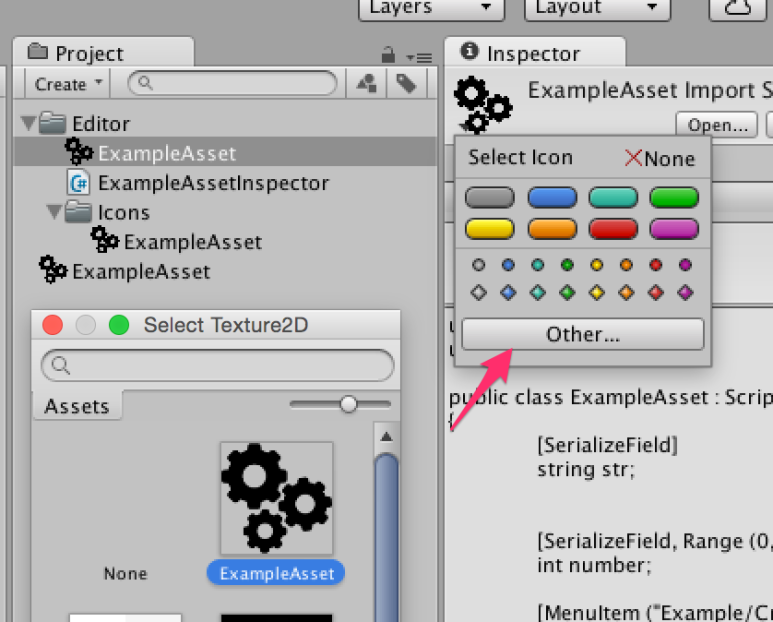
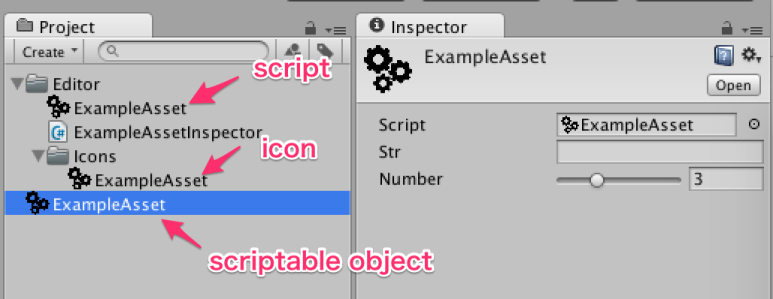
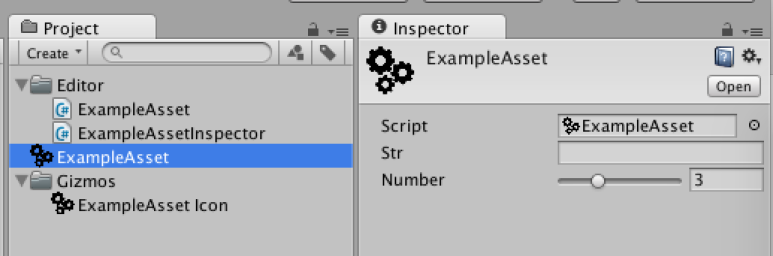


So I'm using the UI-default shader as a starting point for my sprite shader, and if I have the _ColorMask property my sprite doesn't render at all. Removing the property allows the sprite to render but then it doesn't clip properly. Even if I remove the code where the color mask is being used, just having the property still breaks the shader.
I would recommend using the Sprites-Default or Sprites-Diffuse shader as a basis - why use UI-default? Without seeing your code, can't really suggest anything else
Small note: If you have spaces in your shader name, this does not seem, to work.