

FABRIK Algorithm : IK
1. target 지점으로 reach 를 하면( Forward) 기준이 되는 끝 노드 base 노드가 원래 있던곳에서 떨어지게 된다
2. 이때문에 다시 역으로 target 으로 reach 했던 것을 다시 원래 최초의 끝 노드 지점을 target 으로 잡고
reach 를 하는 (backward) 방식을 FABRIK ( Forward-and-Backward Reaching Inverse Kinematics ) 이라 한다
여기서 reach 는 각 노드들마다 target 을 기준으로 삼고 원래 해당 노드에서 target 기준으로 tail 노드를 끌어와서 target 지점을 목표로 각 노드들이 따라가는 것을 말한다
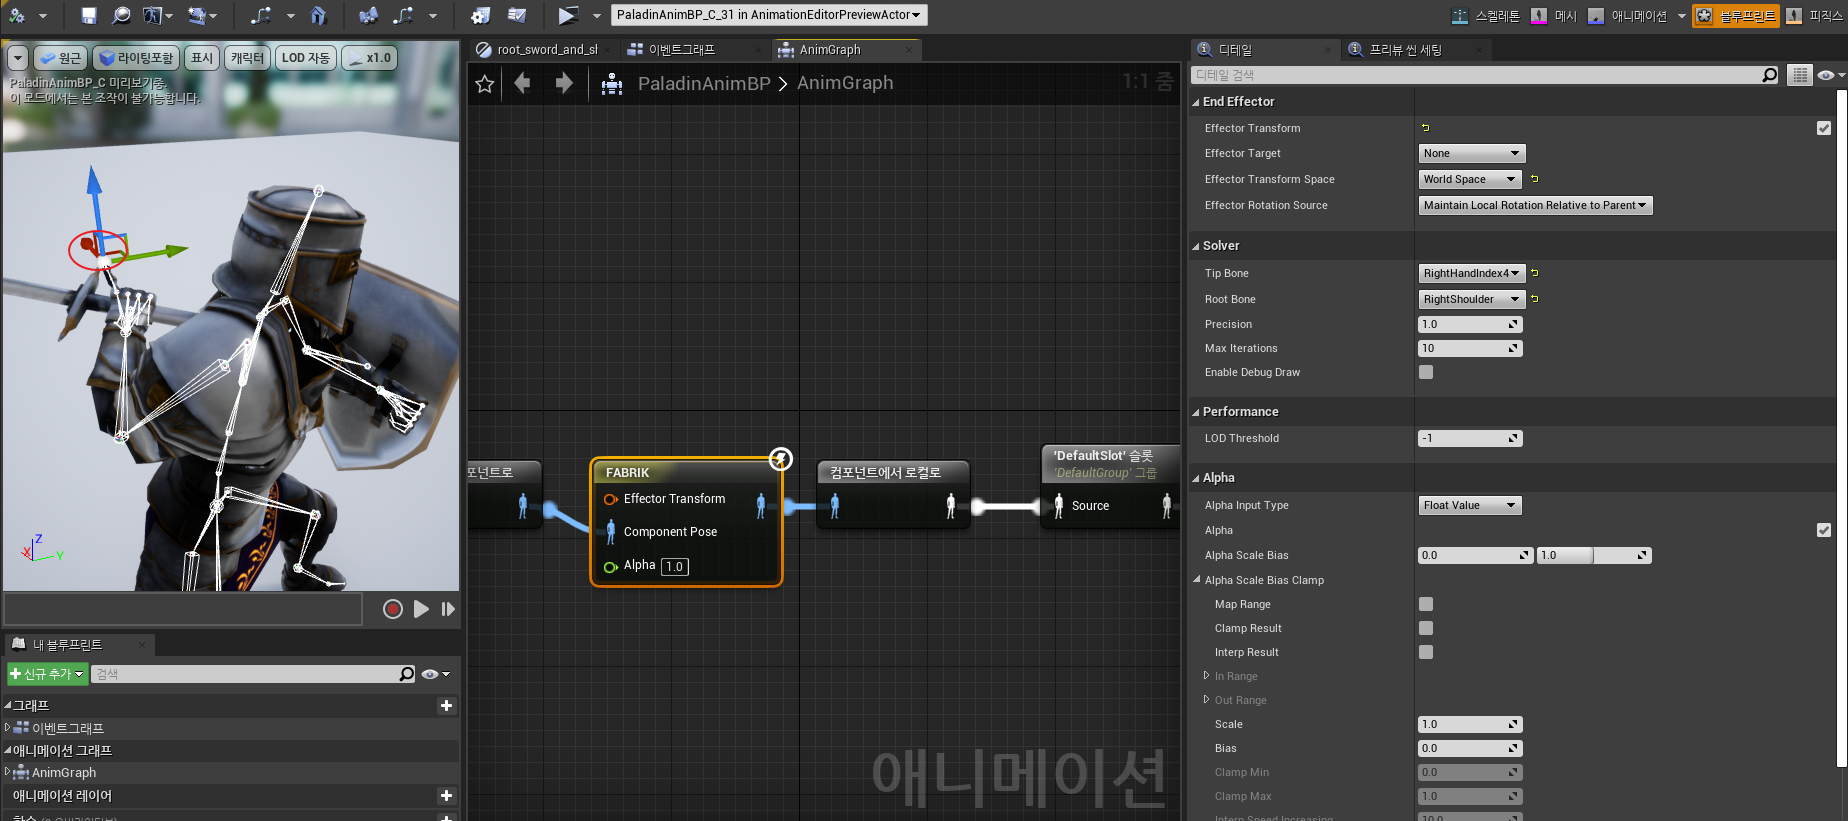
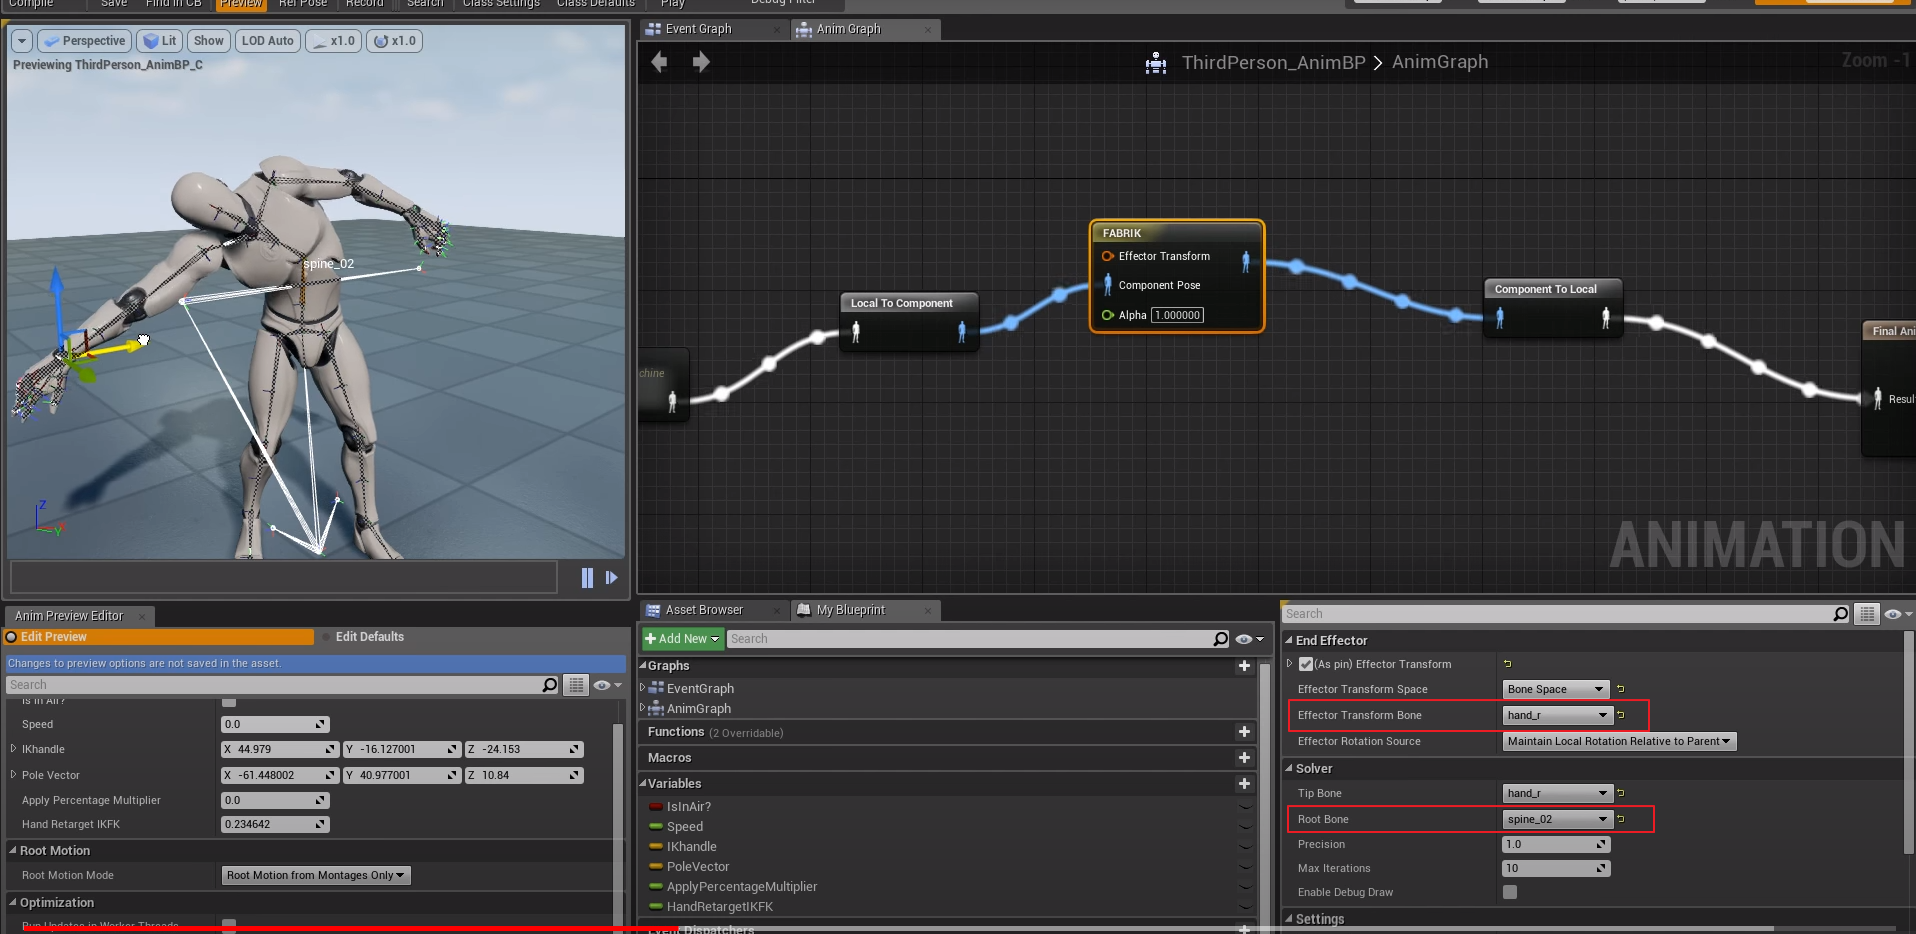
Tip bone : 끝 본에 해당하며 이것을 검지 손가락으로 설정하고
Root bone 은 어깨로 설정하여
타겟 : Effector Trasnform 위 이미지에서는 현재 붉은색 동그라미 부분의 좌표축의 위치
Effector 의 위치를 변경하면 어깨부터 검지까지 Effector 를 따라 가는것을 볼 수 있지만 관절마다의 각도 제한이 없기 때문에 뒷 부분으로 갈때 팔이 기이하게 꺽이는 현상을 볼 수 있다
Effector 위치를 FABRIIK 가 따라 갈수 있는 범위내 (즉 어깨부터 검지 손가락의 총 길이 내의 위치내)
에 있고 뼈가 꼬이지 않는 범위 부근에 위치한다면 다음 그림 처럼 정상적으로 보일순 있다
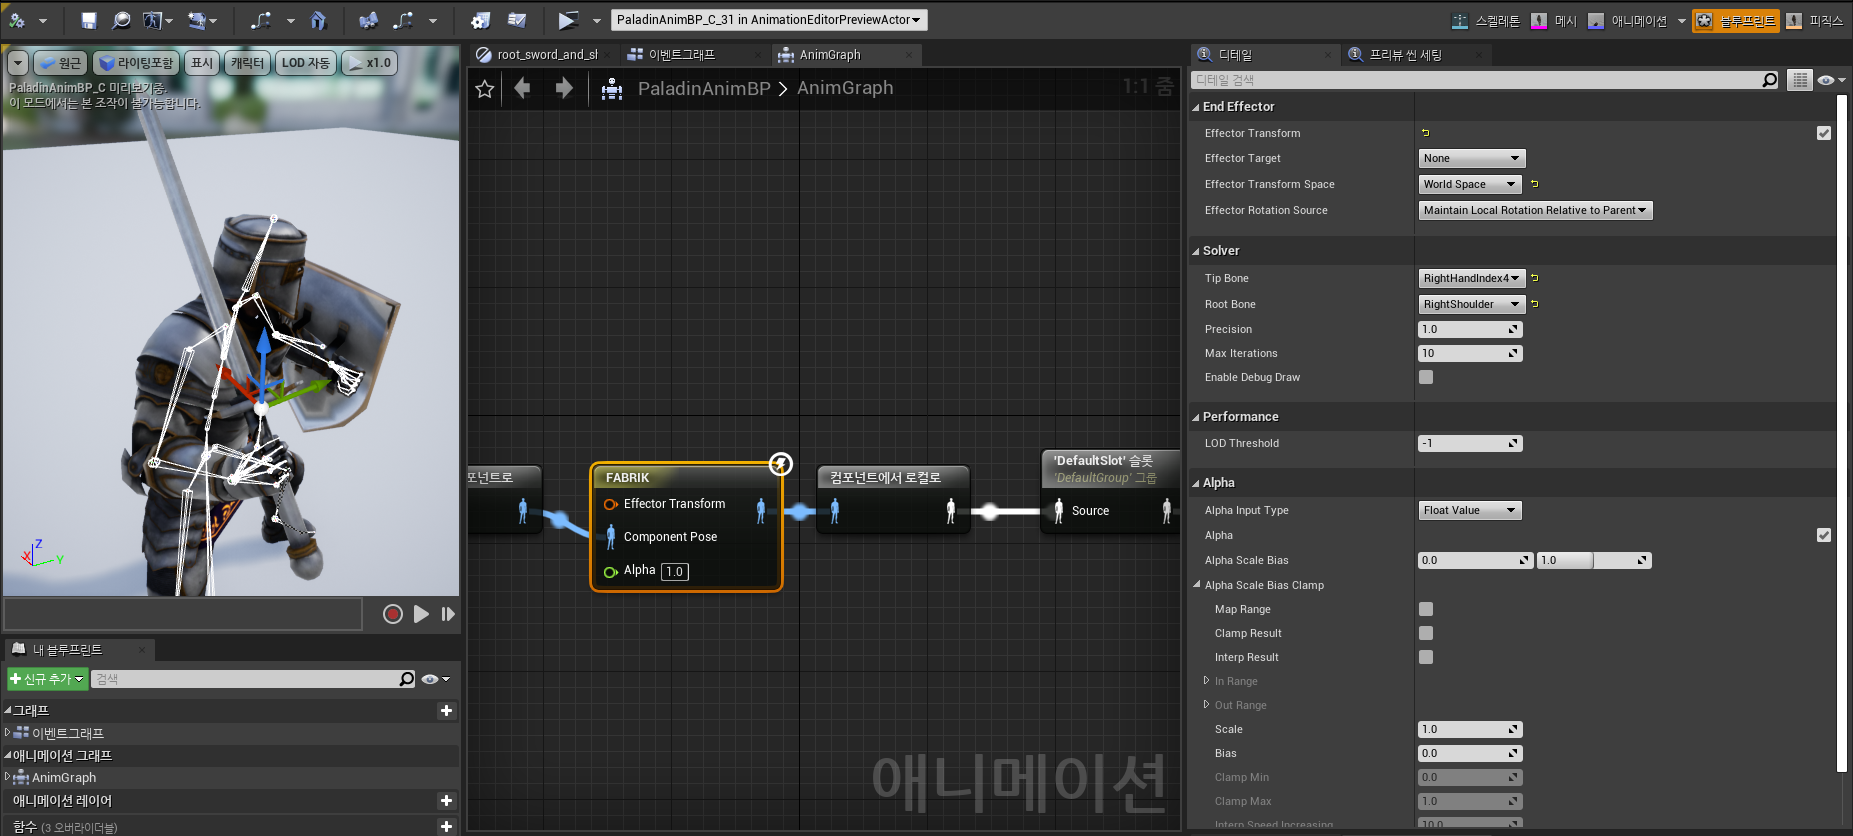
즉 FABRIK 은 인체 관절 보다는 자유스러운 형태에서의 IK 에 더 적합함을 알 수 있다
FABRIK
FABRIK stands for Forward-and-Backward Reaching Inverse Kinematics, and it’s a very simple, fast, and clever solution to the inverse kinematics problem.
Let’s inspect this interesting algorithm in 2D.
Problem
First of all, what is Inverse Kinematics (IK)?
Suppose you have a robotic arm with three joints, whose job is to point to a location:
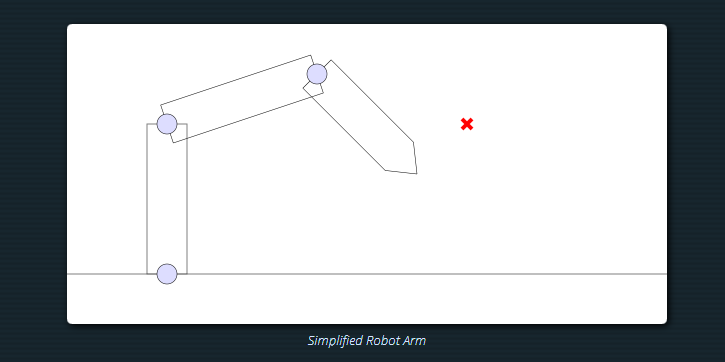
How do you calculate the correct angle of each joint in order to hit the target?
This seems stupid at first – we solve this problem all day long, inside our bodies, as we reach for objects and navigate the world. But there is surprising complexity in this problem.
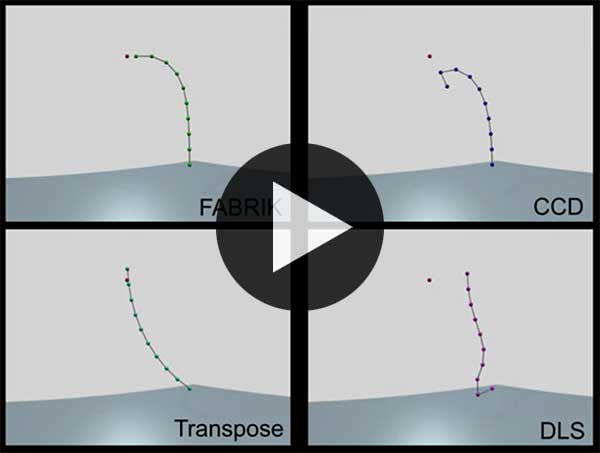
In order to appreciate the FABRIK solution, watch the following video as different algorithms attempt to solve IK in 3D:
Iterative Reaching
FABRIK’s solution to this problem is to iteratively reach for a target location.
Let’s start with the most basic setup.
Suppose there aren’t any joints, and you simply want a line of a fixed length to follow your mouse cursor:
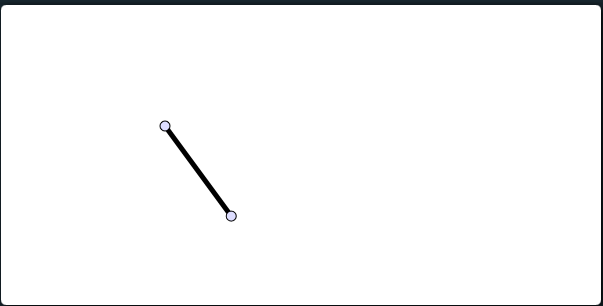
Reaching, according to FABRIK, consists of:
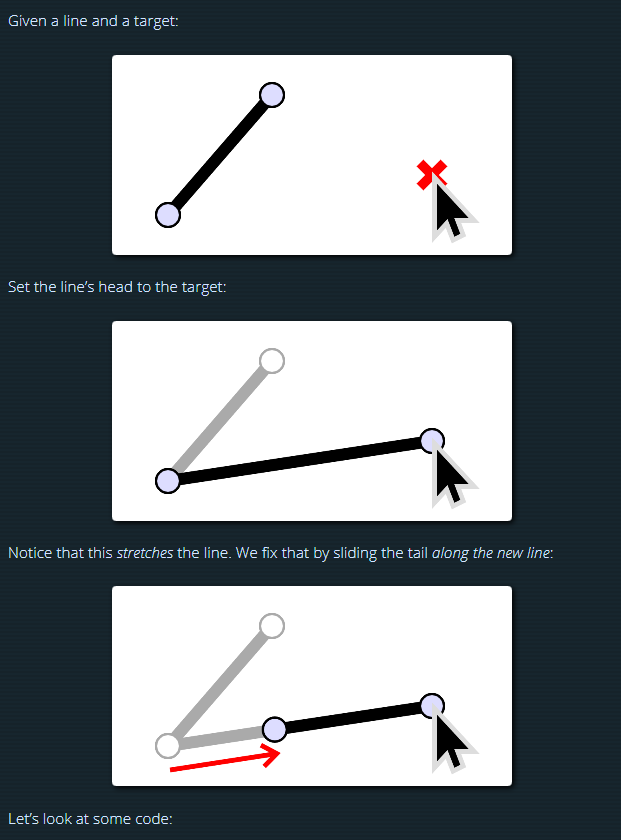
- Given a line and a target…
- Set the line’s head point to the target, stretching the line
- Slide the line’s tail point along the new stretched line to fix the length
Let’s look at this visually.
Let’s look at some code:
|
1
2
3
4
5
6
7
8
9
10
11
12
13
14
15
16
17
18
19
20
21
22
23
24
25
26
27
28
29
|
function reach(head, tail, tgt){
// returns new head and tail in the format of:
// [new_head, new_tail]
// where `new_head` has been moved to `tgt`
// calculate the current length
// (in practice, this should be calculated once and saved,
// not re-calculated every time `reach` is called)
var c_dx = tail.x - head.x;
var c_dy = tail.y - head.y;
var c_dist = Math.sqrt(c_dx * c_dx + c_dy * c_dy);
// calculate the stretched length
var s_dx = tail.x - tgt.x;
var s_dy = tail.y - tgt.y;
var s_dist = Math.sqrt(s_dx * s_dx + s_dy * s_dy);
// calculate how much to scale the stretched line
var scale = c_dist / s_dist;
// return the result
return [
// copy the target for the new head
{ x: tgt.x, y: tgt.y },
// scale the new tail based on distance from target
{ x: tgt.x + s_dx * scale, y: tgt.y + s_dy * scale }
];
}
|
cs |
This should be fairly straight-forward, but there is one important property to notice:
This function always succeeds. The line will always be moved so that it touches the target.
Making it Iterative
How can we make the process iterative? I.e., instead of pulling around a single line, how can we pull along a chain of lines?
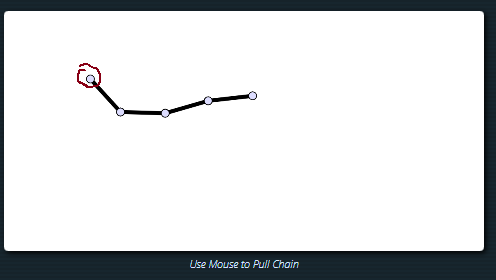
It’s quite ingenious:
The act of sliding the tail along the line can itself be a reach.
Think about it. We have all the ingredients.
To perform a reach, we need a line (head + tail), and a target location. Well, in a chain, the tail of one segment is the head of another segment. For each segment, we simply perform a reach with the new target, until we run out of segments – then we slide the final tail to the target:
|
1
2
3
4
5
6
7
8
9
10
11
12
13
14
15
16
17
18
19
|
// initialize target
var tgt = mousePosition();
// for each segment (except the last one)
// perform a reach for this segment
var r = reach(segments[i], segments[i + 1], tgt);
// update this node
// (`r[0]` is guaranteed to be the same point as `tgt`)
segments[i] = r[0];
// update the target, so the next segment's head
// targets this segments new tail
tgt = r[1];
}
// for the last segment, move it to the target
|
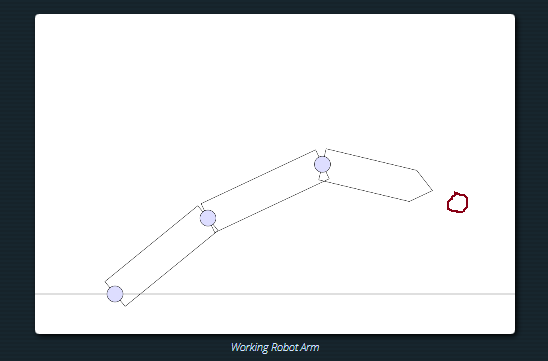
Forward and Backward
We haven’t quite made a robot arm though, have we?
A robot arm doesn’t move around freely like a chain – it’s fixed at the base.
The last insight of FABRIK is that since we are guaranteed the head of the chain will always reach its target, we can perform the iterative reach in reverse to ensure that the base of the arm will always stay fixed.
Said another way:
First we perform the iterative reach like normal, so the head is guaranteed to be touching the target. Then we perform the iterative reach in reverse, so that the tail is guaranteed to be touching the base.
And that gives us an arm:
Here’s the code:
|
1
2
3
4
5
6
7
8
9
10
11
12
13
14
15
16
17
18
19
20
21
22
23
|
// save the fixed base location
// perform the iterative reach in the forward direction
// (same as before)
var tgt = mousePosition();
var r = reach(segments[i], segments[i + 1], tgt);
segments[i] = r[0];
tgt = r[1];
}
// at this point, our base has moved from its original
// location... so perform the iterative reach in reverse,
// with the target set to the initial base location
tgt = base;
var r = reach(segments[i], segments[i - 1], tgt);
segments[i] = r[0];
tgt = r[1];
}
segments[0] = tgt;
|
Conclusion
It’s quite amazing that such a simple concept – a stretched reach – has turned into solving the complex and puzzling inverse kinematics problem.
There are a lot of ways to extend this algorithm too.
Moving into 3D complicates it because orientation of the segments matter, but by tweaking the reach function, it can be made to work.
Adding constraints like fixed range of motion over a joint is possible too, but requires thought about where to enforce the constraints during the iterative process.
Moving objects other than lines is possible too (i.e., rigid triangles), if you can break down the objects into lines, and traverse the heirarchy correctly while iterating.
The important part is understanding the core idea, which I hope is clear now. Go forth, experiment, and have fun!
posted 9 Jan 2018 by Sean
tags: 2d, algorithm, javascript, heuristic
ref : https://sean.cm/a/fabrik-algorithm-2d
언리얼에서도 FABRIK 이 사용 되는것을 볼 수 있다
FABRIK
Forward And Backward Reaching Inverse Kinematics, 앞뒤로 늘어나는 IK 를 사용하는 애니메이션 노드입니다.

Forward And Backward Reaching Inverse Kinematics (FABRIK) 은 (최소 2 링크 이상) 임의 길이의 본 체인에 작동하는 IK 솔버입니다.
우선 (위 그림과 같이) 애니메이션 블루프린트 의 애님 그래프 에 FABRIK 노드를 추가하는 것으로 FABRIK 을 사용할 수 있습니다.
추가하고 나면, 컴포넌트 포즈 에 추가로 노드는 이펙터 트랜스폼 을 받는데, 절대 트랜스폼 이 될 수도, (같은 스켈레톤의 다른 본을 기준으로 하는) 절대 트랜스폼이 될 수도 있습니다. 엔드 이펙터 세팅은 TwoBone_IK 노드와도 매우 유사합니다.
적용된 스켈레탈 컨트롤의 현재 세기를 결정하기 위하여 FABRIK 노드는 플로트 Alpha 를 받는데, 노드 자체에서 설정하거나 플로트 변수를 통해 설정 가능합니다.
FABRIK 노드에 대한 디테일 패널에서는 솔버 작동방식을 더욱 세밀히 조절하는 데 사용할 수 있는 추가 세팅을 확인할 수 있습니다:

ref :
https://docs.unrealengine.com/ko/Engine/Animation/NodeReference/Fabrik/index.html
영상 : https://www.youtube.com/watch?v=Okq-mkEvcGU&t=82s
위 알고리즘하고 매칭해본다면 End Effector 가 따라가는 Target, Solver 가 base 에 해당한다고 보면 된다
Effector : 오른 손_r (hand_r)
Solver 는 허리 쪽 Spine_02
'게임엔진(GameEngine) > Unreal4' 카테고리의 다른 글
| Analytic Two-Bone IK(투 본 IK) (0) | 2020.05.13 |
|---|---|
| CCD IK (Cylic Coordinate Descent IK ) : IK (0) | 2020.05.06 |
| Calling Blueprints in the Editor (0) | 2020.04.27 |
| 비주얼 어시스트 언리얼엔진 옵션 (0) | 2018.09.26 |
| SLATE_ATTRIBUTE 와 TAttribute (0) | 2017.05.14 |